I was recently faced with the task of having to apply updates to an server running ESXi 5. Now, you would think that this would be a pretty simple job but it actually turned out to be more difficult that I would have though. The main problem was that I couldn’t find any concise instructions. I found a couple of guides but they were so complex I was pretty sure something would go wrong before I got to the end. Hopefully this guide is so simple nothing can go wrong…
In terms of updating you’ve actually got a few options. For some updates you can use the vSphere Management Assistant which is a virtual machine that helps manage ESXi boxes. The problem is a lot of the updates require maintenance mode which means all the VM’s, including the MA, have to be stopped. If you’re rich enough to have licensed host then you can update via vCenter. To be honest though if you are rich enough to buy that you are probably rich enough to pay someone to do it for you! The last option is to perform the update using an SSH shell into the host and this is the option I’ll use here.
Step 1: Aquire the Required Updates
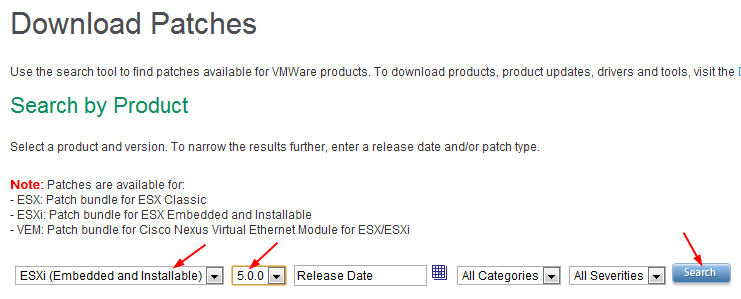
Head on over to the VMWare patch center and set the search settings as shown below (alter for your version if necessary):
You will be presented with all the patches available for your system. Each patch will look like this:
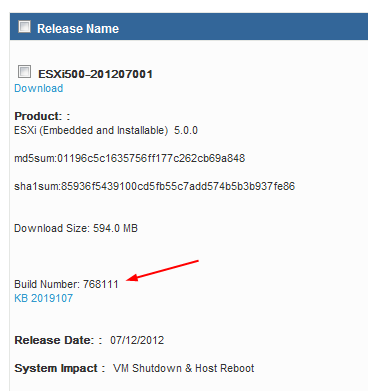
Notice that I’ve highlighted the build number. Find the build number of your install and only download and install patches with a build number greater than it (I think you actually only have to install the latest patch but I installed all patches that were newer than my system to be on the safe side). The build number can be found in the vSphere Client (I’ll try and get a screen shot soon). Download the patches to your local machine and them upload them to a patch folder on your host.
The easiest way to quickly upload a few files like this is by browsing the data store. Select the Configuration tab, then storage, right click on you main storage array and select Browse Storage. A new dialog will open which will allow you to create folders and upload the patch files.
Step 2: Enable SSH and ESXCli
With the Configuration tab still selected choose Security Profile and click Properties (top right of the window). The services dialog will open which will allow you to switch on ESXCli and SSH. This may result in a warning message in the Summary tab for the client.
Step 3: Enter Maintenance Mode
Switch off all your guest operating systems and then switch to the Summary tab of the host. Click the Enter Maintenance Mode link.
Step 4: Shell into the Host
Fire up Putty and connect to your host, you’ll need to log in as root. You’ll probably get a certificate warning the first time which you can ignore.
Step 5: Apply the Patches
You don’t have to be in any particular folder in order to apply patches and you need to provide the full path to the patch file. The command you run is like this:
esxcli software vib update -d /vmfs/volumes/[datastore1]/[patches]/[patch].zip
Obviously replace datastore1, patches and patch with the name of your data store, patches folder and patch file. Install patches from oldest to newest. Each patch will take a few seconds to run and will produce output like this:
![]()
If it doesn’t say the patch completed successfully check to find out what went wrong before continuing. Once all the patches have been applied enter the command “reboot” to re-start the host. Once the host has restarted leave maintenance mode in the same way you entered it.
If the VMWare Tools were updated you’ll need to go through each host and update the tools in them. For some Windows hosts this is fairly automatic but any Linux hosts will need manual intervention. Note that because you initially boot into maintenance mode any guests that you have set to start automatically won’t start.
From my point of view the best reason to apply these patches was to fix the seriously annoying auto-start bug that crept into ESXi 5 Update 1. Essentially the problem was that none of the guests set to auto-start actually started on re-boot. I think it was the July patch that fixed this issue.