This guide assumes you have a Raspberry Pi already installed e.g. you can log in and see either a command prompt or the desktop. This guide will make use of the command line. I’m setting up a headless server as I write this and working on a Windows 10 machine. All key generation and configuration will be performed using PuTTy.
You don’t have to use keys for SSH authentication but it’s generally considered more secure than password authentication and it’s certainly more convenient if you have multiple machines to manage. The keys used come as a private and public pair. The public part is installed on the Raspberry Pi and the private is kept securely and secretly by you.
Generating SSH Keys
Most people that SSH (aka shell) into machines from Windows use an application called PuTTy, there are alternatives but I don’t remember ever seeing any of them used. If you don’t have it already download and install PuTTy, make sure you get the full installer as we’ll need some of the other tools as well.
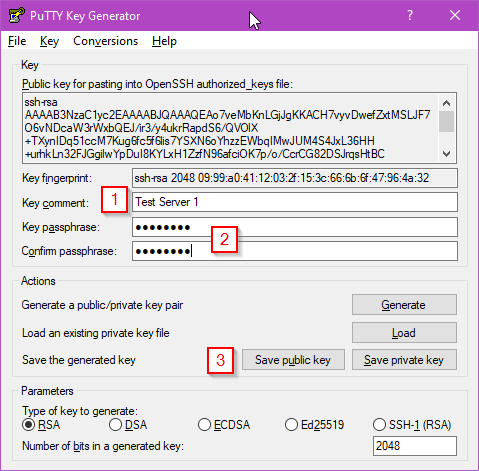
Start the PuTTYgen application, this is the application that generates the keys that we’ll be using during the rest of the process. Press the generate button, there’s no need to change any of the other settings as the defaults are fine. The application will ask you to generate some randomness by moving your mouse over the application window. The public key will appear where it says “No Key” in the image below, we’ll need that later.

Once the key is generated you need to assign a memorable name (1) and, optionally, a passphrase (2) before saving the keys (3) – DO NOT close this window yet though!.
The name or comment that you give the key should be something the identifies the key and the machine it it used with. Technically, there’s nothing to stop you from using the same key for every machine you need to log into but this means if your key becomes compromised multiple machines are vulnerable. Remember, keys don’t cost anything, you can have as many as you want.
Adding a passphrase is up to you and depends on how secure you want to make your system. If your private key becomes compromised and doesn’t have a passphrase anyone who has a copy can access your machine. Setting a passphrase on the key makes it much hard for a bad actor to use your key. For a publicly accessible machine I would always set a passphrase, at work I would usually set a passphrase – maybe not for a test machine, in my home lab I do use a password but I might change that. The downside of setting a passphrase is you need to enter it every time you use the key.
Save the public key into a file with a sensible name, the comment you set earlier is not a bad choice for file name. This file doesn’t have to have an extension. It contains only plain text so adding a “txt” extension won’t hurt anything. PuTTy recommends that the private key get a “ppk” extension as that’s what it will look for. As with the public key this is just a plain text file. If you don’t set a passphrase you’ll be warned when you save the file.
A Quick Side Note on Key Formats
You might be wondering why the instructions tell you not to close the window after you’ve saved the files. The simple reason is because the format that the key generator saves the public key in (SSH2 format) is not the same as the format used by the OpenSSH configuration file which we’ll be creating in a moment. There are utilities to convert between the formats and you could even do it by hand in a couple of minutes but PuTTy provides the public key correctly formatted for OpenSSH at the top of the window.
You now have the keys required so it’s time to install the public key on the Raspberry Pi. Note: the key shown above is not used anywhere, I didn’t save it and you can only see the public key anyway.
Installing the Public Key on the Raspberry Pi
To install the public key you’ll need to have access to a terminal on your Raspberry Pi. When I created the media for the Pi I’m using (see Raspberry Pi Imager) I selected the option to enable SSH with passwords but this could equally be done by connecting a keyboard and mouse.
At the terminal run the following commands:
cd ~
mkdir -m 700 .ssh
The first line ensures that you are in your home directory and the second creates a folder called “.ssh” with the correct permissions set – only the owner (you) is allowed access. Now enter the following commands to create the “authorised_keys” file. This is the file that contains the keys that will be allowed to log in.
cd .ssh
nano authorized_keys
The first command switches you to the “.ssh” directory the second opens a terminal text editor called nano.
Leave nano open for now but switch back to your Windows machine and find the PuTTy Key Generator window again – remember above you didn’t close this window ;-). Copy all the text from the area titled “Public key for pasting into OpenSSH authorized_keys file” and paste it into the nano editor. PuTTy supports copy and paste operations but it is unlike other applications. When you highlight text it is immedicably added to the clipboard. To paste text from the clipboard you right click. Once you have pasted the public key into nano save the file by pressing Ctrl+X followed by Y and Enter.
At this point it’s worth quickly checking that the file you’ve just created has the correct permissions and owner. If these are set incorrectly the configuration won’t work and it won’t be obvious why. Enter the following “ls” command (line one) and press enter:
ls -la

total 12
drwx------ 2 pi pi 4096 Nov 11 17:13 .
drwxr-xr-x 5 pi pi 4096 Nov 11 17:03 ..
-rw-r--r-- 1 pi pi 463 Nov 11 17:13 authorized_keys
The interesting line of output is the last one. This shows the permissions and owners for the “authorized_keys” file. The file must be owned by you (the user pi in this example, this is the default Raspberry Pi user) and have permissions 644 e.g. read+write for the owner, read only otherwise. If the settings are different from this you need to mod and own the file with the following commands:
sudo chmod 644 authorized_keys
sudo chown pi:pi authorized_keys
The first command sets the permissions the second sets the owner. I’ve used sudo here to make sure it happens, it may or may not be required. The key is now installed and ready to test.
Using your Private Key on Windows with PuTTy
Now we’ll use the keys you created earlier to connect to your Raspberry Pi machine. Start by opening PuTTy. Enter the IP address of your machine into the text are labelled “Host name (or IP address)” (1) and then click the “Auth” category (2) in the settings tree on the left, you might need to expand the SSH item.
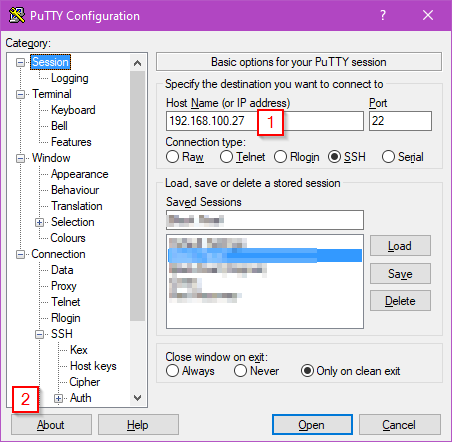
In the “Auth” settings window click “Browse” and select the private key file that you saved earlier and then click the “Open” button. In the terminal window that opens you’ll be asked for the username that you are connecting as (e.g. pi). If you’ve set a passphrase you’ll now be asked for that. You should now be presented with a logged in terminal window. One of the first lines in the terminal window should indicate that you were authenticated with a public key. If you get a message about the key not being authorized or valid check that you are using the correct private key, that the format of the key in the “authorized_keys” file is correct and that the permissions on that file are correct.
Disabling Password Authentication
Since key based logins are now working it’s a good idea to disable password based login. Start by opening the sshd config file with the following command as a terminal
sudo nano /etc/ssh/sshd_config
Somewhere in this file, for me it was about half way down, you’ll find the line
#PasswordAuthentication yes
That needs to be changed to
PasswordAuthentication no
This will disable password authentication for SSH completely. Note: strictly speaking it was only necessary to add the “PasswordAuthentication no” line to the file as the previous line was commented out as indicated by the # symbol at the start. It’s generally a bad idea to leave comments like this in a file though. For more information on configuring SSH see the man page. Once you’ve made the change, save your changes and exit nano with Ctrl+X followed by Y and Enter.
Check the Config File
Modifying the SSH config file incorrectly could easily result in you being locked out of your Raspberry Pi, at least for remote access. The consequences of this can range from a mildly annoying to nearly impossible to deal with if you Raspberry Pi is in a difficult to reach location. For this reason SSH has a built in self test function.
For the purposes of this tutorial I changed “PasswordAuthentication no” to “Passworduthentication maybe”, I’ve never seen a configuration file accept maybe as a setting! I then use the -t flag on sshd to test the configuration file. The command and it’s output is shown below. Notice it has correctly identified the incorrect option. If there are no errors detected there is no output.
sudo /usr/sbin/sshd -t

/etc/ssh/sshd_config line 58: unsupported option "maybe".
Restart the SSH Daemon
If everything appears to be configured correctly it’s time to restart the SSH Daemon. This can be done by either restarting the Raspberry Pi with “sudo reboot” or just restarting the sshd process. To perform the latter operation simply enter
sudo systemctl restart sshd
The nice thing about performing a restart of the daemon rather than rebooting the machine is existing connections remain valid. This means that if there is a configuration issue you can fix it. With a reboot all existing terminals will be terminated so any configuration issues mean getting out the keyboard and monitor. I think there are probably some situations where this trick won’t work but it’s well worth knowing about.
Assuming your changes are correct you should now find that if you try too log in with PuTTy using a password you get an error dialog like this
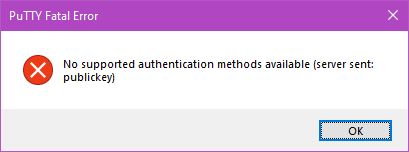
You’re all done, your Raspberry Pi is now configured to allow only key based remote logins.
Converting Keys Created by OpenSSH to PuTTy Format
The keys created by the OpenSSH application (which is the most widely used implementation of the SSH protocol) are not compatible with PuTTy. The underlying encryption protocols and keys are compatible but they way the two different applications store the keys aren’t. Fortunately the PuTTygen application has the ability to convert OpenSSH keys into it’s PPK format. Note that other applications use the PPK format as well such as WinSCP.
Converting the OpenSSH keys is really easy. Start by loading PuTTygen and selecting Conversions > Import Key from the menu. When the file selection dialog appears select the OpenSSH private key. If the key has a passphrase you’ll be asked to enter it now. As shown above you’ll now have a key that you can save in PuTTy format. You have the option to save both the public and private key but chances are only the private key will need to be saved as you already have the public key from when it was generated by OpenSSH.
It’s probably worth pointing out that the private key format for both OpenSSH and PuTTY contain the public key so it can always be recovered if you lose it. They disagree with how the public key should be stored and whether it should be encrypted as well as a couple of other things.
Don’t Like Typing In Your Username?
When you connect to a shell it asks you for your username and I find that tedious, I already know who I am. A quick little quality of life improvement is to add your username before the machine address / host name for the settings. For example rather then a host name of “192.128.100.27” use “[email protected]”. The username will be supplied automatically. Combined with saving the location of the private key file this provides a simple one click login process.