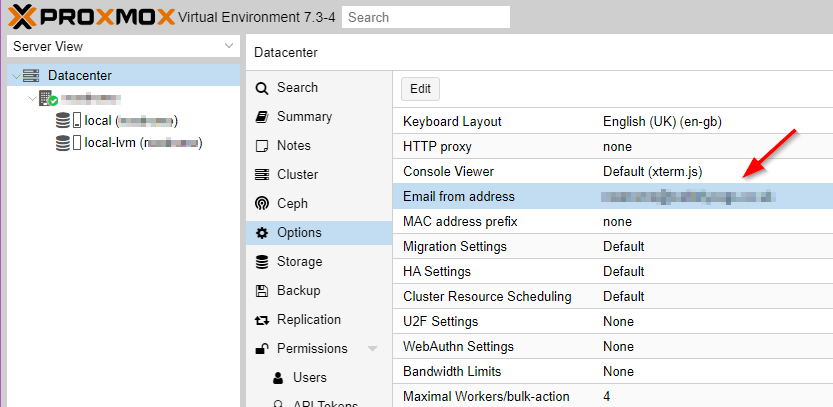
Getting email notifications from Proxmox is important as you absolutely want to know what that disk fails at 3AM or if the backup decides it’s had enough and gives up. The first thing you need to check is that you have set a valid email addresses for where the email will come from. By default it’s set to root@$hostname which stands a fair chance of being caught in a spam trap. To change this open the Proxmox web UI and under Datacentre > Options double click Email from address and set to something with a valid domain such as [email protected].
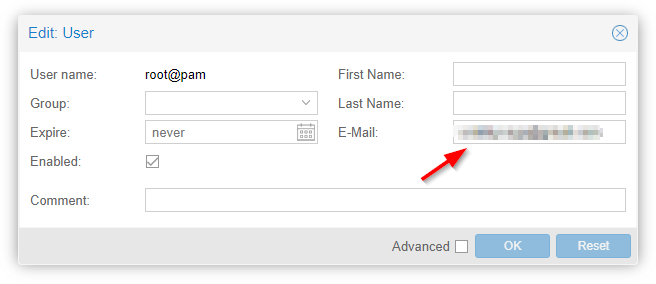
Emails will, by default, go to the root user so they need to have a valid email address (while you’re at it give all the users a valid email address). To set this go to Datacenter > Permissions > Users and then double click the root user. The user edit box will open where you can set an email.
Using Google to relay your email used to be fairly easy but they have tightened up the security to the point where it barely works anymore and I suspect in time it will stop working altogether. At a minimum you will need to have two factor authentication turned on for the account (you should have that anyway). Google mail servers require authentication to ensure that you have the right to send and this requires a library that Proxmox doesn’t ship with so lets add it. We’ll also add mailutils as it makes life easier – it’s the Swiss army knife of email. From the host open a new shell as root and then enter the following.
apt update
apt install -y libsasl2-modules mailutils
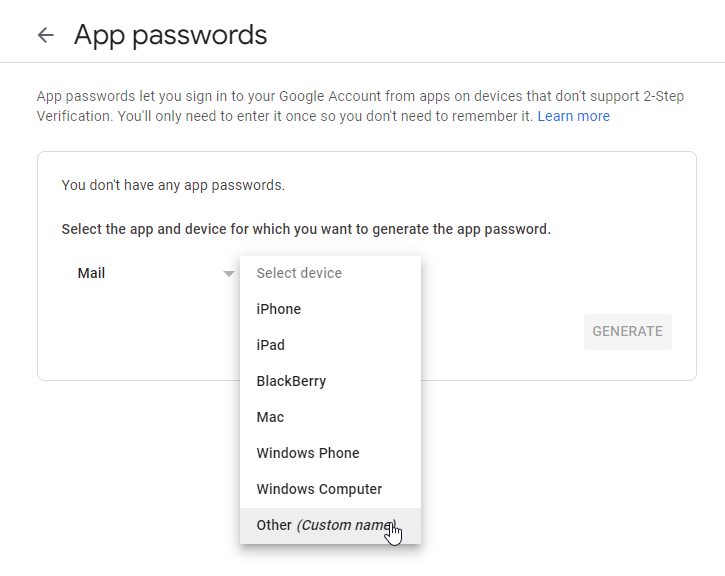
Now log into your Google account (myaccount.google.com) and perform a search for app passwords you will probably have to confirm your account password. I hunted high and low for a link via the security page but I couldn’t find one, I suspect you can only find this option by searching now. It should open a page that looks similar to the image below. Select mail as the application to generate a password for and other for the device. Selecting other switches you to the device name page. Name this something like <hostname> Proxmox so you know what the password is for and then click generate.
You will now get a new dialog that shows you the app password. Write this down somewhere secure! You can’t access this password again though Google. Now back at the command prompt we’ll safely store the password created in a way postfix can access it.
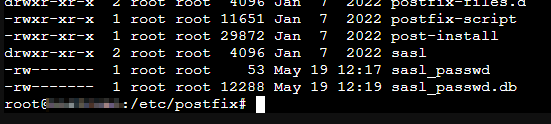
cd /etc/postfix
nano sasl_passwd
In nano enter the following single line replacing the email and password with your credentials. Once complete save and exit the file.
smtp.gmail.com [email protected]:password
Alter the permissions on the password file so that it can only be read and written by root and then generate the password database file.
chmod 600 sasl_passwd
postmap hash:sasl_passwd
Now open the mail.cf configuration file for Postfix
nano /etc/postfix/main.cf
Comment out (with a #) or remove the existing line that starts relayhost and the one that starts mydestination. Add the following lines to the bottom of the file.
relayhost = smtp.gmail.com:587
smtp_use_tls = yes
smtp_sasl_auth_enable = yes
smtp_sasl_security_options =
smtp_sasl_password_maps = hash:/etc/postfix/sasl_passwd
smtp_tls_CAfile = /etc/ssl/certs/Entrust_Root_Certification_Authority.pem
smtp_tls_session_cache_database = btree:/var/lib/postfix/smtp_tls_session_cache
smtp_tls_session_cache_timeout = 3600s
Save and close the file and then reload Postfix
postfix reload
Send two test emails as shown below. The first is testing the email system the second also tests that Proxmox can send emails.
echo "Test Email" | mail -s "Test Subject" [email protected]
echo "Test email from Proxmox: $(hostname)" | /usr/bin/proxmox-mail-forward
If the email arrives then congratulations you have set up the Proxmox email system. It’s probably worth taking a quick look at the system logs just to check everything looks good. These can be found from the command line or Datacenter > [Host] > System > Syslog.
Twiddling the Headers
At the moment the from will appear to come from your own account but it would be nice if they looked like they came from the machine itself. This can be achieved with some header rewriting which can be done by Postfix. This step isn’t necessary and it might even increase the chance of getting caught in a spam trap. If you want to give it a try first install the postfix-pcre package like this
apt update
apt install postfix-pcre
Now create a configuration file that defines the headers you want to alter
nano /etc/postfix/smtp_header_checks
Enter a like like this altering as needed
/^From:.*/ REPLACE From: myhost <[email protected]>
Create a database file from the configuration file
postmap hash:/etc/postfix/smtp_header_checks
Edit the Postfix main configuration file
nano /etc/postfix/main.cf
Add the following line to enable the header rewriting
smtp_header_checks = pcre:/etc/postfix/smtp_header_checks
Reload Postfix and then send the test emails a noted above
postfix reload
When I last tested this I found the Google automatically re-wrote the from email address but left the name in place – better than nothing.
Additional Notes
Once mail is set up you can also get email from the automatic upgrade system if you set that up.