Today I’ll be deploying a Jellyfin server as a Docker container. I’ve used Jellyfin for several years now, and I find it to be an excellent media server. Prior to Jellyfin I use Plex. I have to admit, Plex is good, but Jellyfin is better. The set up I’m describing here is what I use for my own home server set up. It goes into a fair bit of detail on how to set up the shares on my system which probably won’t be exactly the same on your system. I’ve documented my server set up and I like it, there’s a fair bit of set up but once it’s working it’s robust and very feature complete.
Create the ZFS Datasets
This is the first place where you may find my setup isn’t relevant to you. I have a five disk RAIDZ2 array for storing our media hosted by my Proxmox server. This provides a good balance of features and means I only need to run a single server. Below I create a just one new dataset for movies but I have datasets for series, music, books and photos. Create datasets as you need them and then bind them into your servers.
Shell into your Proxmox server and create a movies dataset
zfs create tank/movies
Switch to the /tank directory and own the movies folder with your user and the lxc-users group – this is needed for the sharing.
# cd /tank
# chown doozer:lxc-users movies/
# ls -la

total 21
drwxr-xr-x  6 root   root         6 Jul 17 14:17 .
drwxr-xr-x 19 root   root      4096 May 18 16:17 ..
drwxr-xr-x  6 doozer lxc-users    6 Jul 11 17:24 home
drwxr-xr-x  2 doozer lxc-users    2 Jul 17 14:17 movies
drwxr-xr-x 30 doozer lxc-users   30 Jul 16 09:34 music
drwxrwxr-x  2 doozer lxc-users    2 Jul 14 19:32 scratch
Map the ZFS Datasets
Now you need to map the new datasets into the container that is hosting the Samba service. Open the configuration file for the container.
nano /etc/pve/lxc/100.conf
Add mapping lines for the datasets you’ve created, the other settings should need changing (assuming you’ve already set up and tested sharing). As you can guess from the fact this is mp3 this isn’t my first mapping.
mp3: /tank/movies,mp=/mnt/movies
Restart the share container so that the mappings become active
Create the Shares
Log into Cockpit on the share container. Quickly go into Navigator and check the /mnt folder contains the mappings you expect to see. Switch to File Sharing and create new shares for the mappings you’ve added. The only settings you need to fill in are share name (your choice), path (e.g. /mnt/movies) and to set Windows ACLs to on.
Mount the Shares on the Media Server
The media server is a virtual machine which hosts a number of Docker containers. Unfortunately you can’t bind mount into a virtual machine like you can into an LXC container so instead mount the Samba shares in the media server. Create a mount target file on the media server by logging in and then running the commands below. It’s fine if this directory is owned by root, the mount will override this.
cd /data/mnt
sudo mkdir movies
Mount the share, the command to do this manually looks like the one below. This assumes you have a credentials file already created.
sudo mount -t cifs -o rw,vers=3.0,credentials=/root/.fileserver_smbcredentials,dir_mode=0775,file_mode=0775,uid=1000,gid=9999 //fileserver.example.co.uk/movies /data/mnt/movies
To mount the share permanently edit the /etc/fstab file and add:
//fileserver.example.co.uk/movies /data/mnt/movies cifs rw,vers=3.0,credentials=/root/.fileserver_smbcredentials,dir_mode=0775,file_mode=0775,uid=1000,gid=9999
Restart the server to make sure the mounts happen cleanly.
Deploy Jellyfin on Docker Using Portainer and a Stack
When I first started using Portainer I went straight to using the GUI to configure containers but it turns out stacks are a much quicker and simpler way to get the same result. Rather than being presented with hundreds of options you aren’t going to use a stack just lets you specify what you need. The stack I’m using for Jellyfin is this
version: '3'
services:
  jellyfin:
    image: jellyfin/jellyfin
    container_name: jellyfin
    user: 1000:1000
    environment:
      - TZ=Europe/London
    volumes:
      - /data/jellyfin/config:/config
      - /data/jellyfin/cache:/cache
      - /data/mnt/movies:/data/movies:ro
      - /data/mnt/series:/data/series:ro
      - /data/mnt/photos:/data/photos:ro
      - /data/mnt/music:/data/music:ro
      - /data/mnt/books:/data/books:ro
    ports:
      - 8096:8096
      - 8920:8920
      - 1900:1900
      - 7359:7359
    restart: unless-stopped
Deploy Jellyfin on Docker Using Portainer
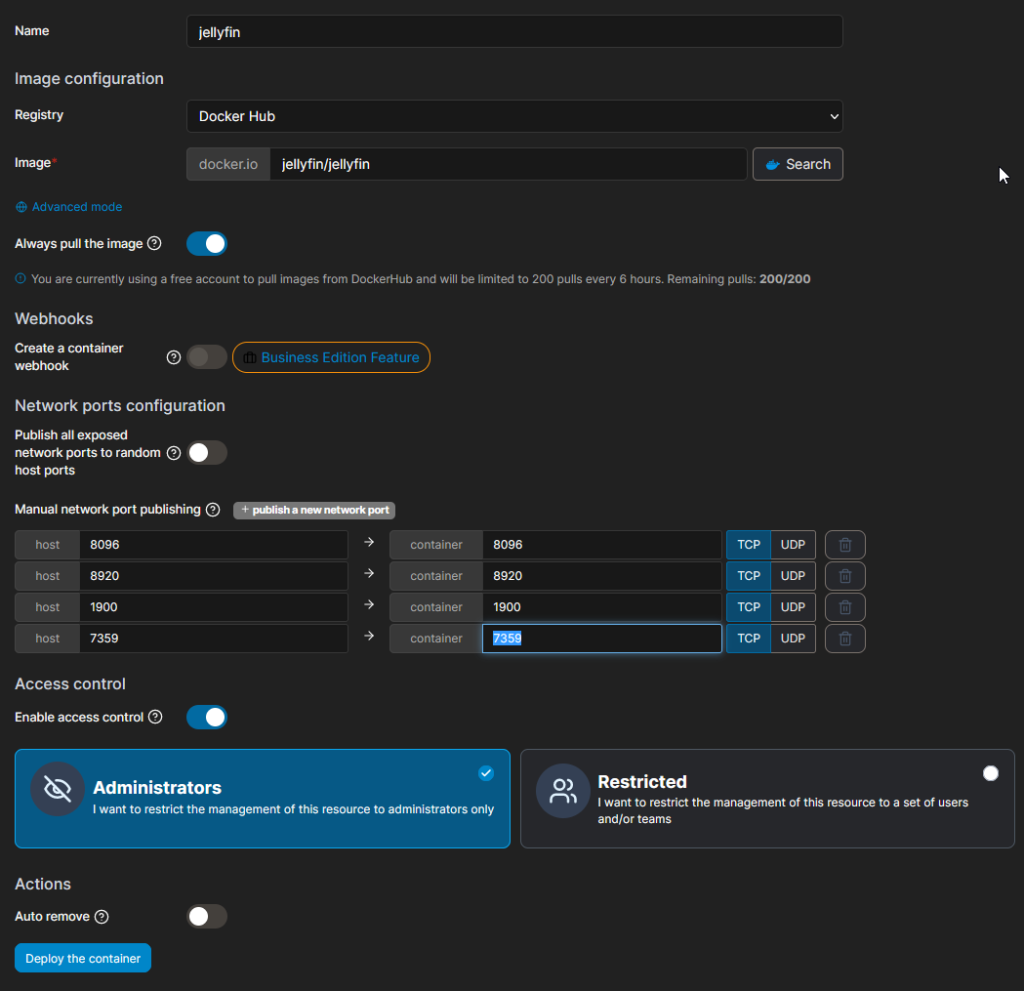
It is assumed you have already got the media service set up with Docker and Portainer. Jellyfin spoils us by shipping their own official container and providing good install instructions. Log into Portainer, select the environment to deploy to, select containers and click add container. Name the container jellyfin and use the official image jellyfin/jellyfin. Jellyfin requires a number of ports to be mapped. The install instructions a a bit quiet about which ports these are but they are here and shown below.
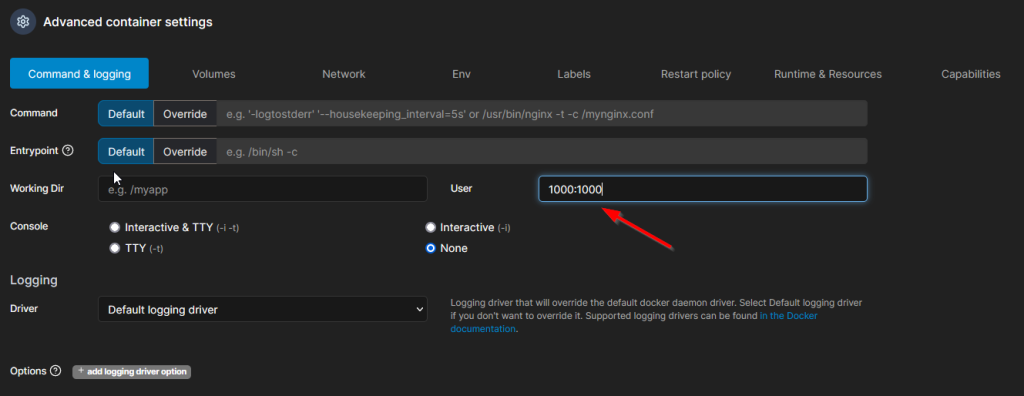
Under advanced options > command and logging make sure you set the UID and GID (probably to 1000:1000). For linuxserver containers you can (and probably should) also set the PUID and GUID environment variables. The Docker instructions provide a little more information. This Reddit post also discusses the issue,
Now you need to set up some bing mount volumes so shell into the media server and create the required directories. Jellyfin recommends two directories, one for config and the other for cache data. The jellyfin folder and it’s subfolders should all be owned by your user account.
cd /data
sudo mkdir jellyfin
sudo chown doozer:doozer jellyfin
cd jellyfin
mkdir config
mkdir cache
Now fill in the volume bindings in Portainer. You’ll also need to make a number of bindings for the media which is in the directories we mounted earlier. For this install I’ve decided to try out the photo support in Jellyfin, I don’t trust it though so I’ve marked it read-only. I later added books and music, although I don’t currently use them, and I marked all the media bindings as read-only.

Network can be left on bridge. The only environment variable I set was TZ=Europe/London which just sets the timezone. There are no labels to set. Restart policy should be set to unless stopped. There nothing to set under runtime and resources and capabilities can be left at the default settings. Click deploy the container.
Firewall
In Proxmox select the media server and open the firewall on port 8096 and 8920.
Setup and Testing
Visit the media server on the port specified above in the configuration e.g. http://media.example.co.uk:8096. You’ll be presented with a setup page. Follow the instructions to configure the system, for the most part that is just telling Jellyfin where it can find you media and what type the media is. One of the reasons I have so many bind mounts is because Jellyfin doesn’t handle mix libraries well. You can select subdirectories but I prefer this layout.