The first thing many people do with their home server is set up file sharing. If you’re running an OS such as TrueNAS this is really simple, but I’m running Proxmox so that I can also easily run virtual machines and this has one big downside: Proxmox is not really set up to act as a NAS. You certainly could install Samba and NFS on Proxmox as it’s just a Debian install at it’s heart, but that’s generally considered a bad idea. The host OS should just act as a host and nothing else.
There are a number of ways to use Proxmox as a NAS. One option is to install Samba and or NFS on the host machine and serve up the shares directly as Proxmox is, at it’s core, just a Debian distribution. The benefit of this is you don’t need any additional software or complex configuration. The downsides are many though. You’ll have to manage the shares by hand and you’ll have created a setup that’s difficult to move to a different machine. Worse though, you’ve contaminated your host OS and that’s a bad idea. Proxmox has a job to do, virtualization, and nothing should interfere with that. Overall I think this using Proxmox like this is a bad idea.
Another option is to install a virtual machine and then pass through the hard drives that you want to share. In hindsight I probably should have looked more closely at this option. Essentially, the hardware would belong to the virtual machine which would then create a file system and share it with the network. The downside of this set up is complexity. Hardware pass through works but it’s a much younger technology. Disaster recovery isn’t going to be as simple and the whole system is more heavy weight. The upside is you get to use something like TrueNas which is powerful and feature rich.
The solution that I’m going to use is half way between these two extremes. Rather than a full virtual machine I’ll be running just an LXC container which will host Samba and or NFS with bind mounting used to allow access to host directories. The benefit of this setup is it’s very lightweight and it’s easy to manage. The downside is the setup is a bit of a chore and it can’t easily be moved from machine to machine. In this article I’ll create the LXC container and set up some basic sharing using Samba which will be managed by Cockpit.
Step 1 Create a Debian 12 Container
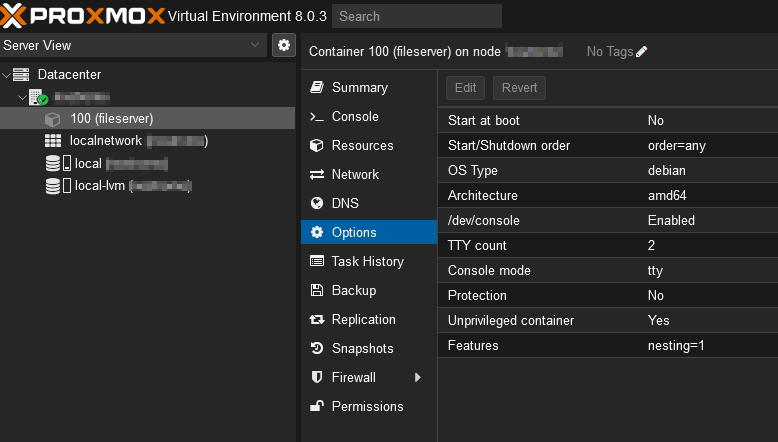
I won’t go into a great deal of detail on creating the container because the official documentation does a great job of it. I’ve given it 2 CPU’s and 512MB of RAM. That much RAM is overkill for this container but it’s shared with the host and it’s trivial to cut back the amount later if needed. I’ve call the container “fileserver” and left is as unprivileged which is the default setting when creating a container. I’ve given it a static IPv4 address and left IPv6 as static and not configured. I mention the IPv6 settings because if you aren’t using IPv6 but set it to DHCP the time out is very long and it looks like the container is not working. I also made a DNS entry for “fileserver” on my router.
Step 2 Installing Cockpit
At the time of writing Debian 12 (bookwork) has not long been released so the version of Cockpit is fairly up to date. Over time time Cockpit will become more and more out of date so at some point you might want to switch to the version from backports assuming there is one. I’m going to add the backports repository but there’s no bookwork backport of Cockpit currently.
Start the container, switch to the console and log in as root. Use nano to edit the apt sources as shown below
# nano /etc/apt/sources.list
Add a backports repository to the bottom of the sources file. Save the file and exit nano.
deb http://deb.debian.org/debian bookworm main contrib
deb http://deb.debian.org/debian bookworm-updates main contrib
deb http://security.debian.org bookworm-security main contrib
deb http://deb.debian.org/debian bookworm-backports main contrib
Run an apt update and full-upgrade. This probably won’t find much as the container is brand new.
# apt update && apt full-upgrade
Now you have the choice of either installing a backport version of Cockpit or the stable version. To install the backport version you have to tell apt to use the backports repository by specifying (the -t flag) or it will pick the stable version. As you can see below there isn’t currently a backport of cockpit.
# apt install -t bookworm-backports cockpit --no-install-recommends

Reading package lists... Done
E: The value 'bookworm-backports' is invalid for APT::Default-Release as such a release is not available in the sources
To install the stable version simply leave of the -t flag. We don’t need any of the recommended packages.
# apt install cockpit --no-install-recommends

Reading package lists... Done
Building dependency tree... Done
Reading state information... Done
The following additional packages will be installed:
  cockpit-bridge cockpit-system cockpit-ws dbus-user-session dconf-gsettings-backend dconf-service glib-networking glib-networking-common
  glib-networking-services gsettings-desktop-schemas libcrack2 libdconf1 libglib2.0-0 libjson-glib-1.0-0 libjson-glib-1.0-common
  libpolkit-agent-1-0 libpolkit-gobject-1-0 libproxy1v5 libpwquality-common libpwquality-tools libpwquality1 libssh-4
Suggested packages:
  cockpit-doc cockpit-pcp cockpit-sosreport xdg-utils sssd-dbus low-memory-monitor
Recommended packages:
  cockpit-storaged cockpit-networkmanager cockpit-packagekit sudo | pkexec | policykit-1 cracklib-runtime libglib2.0-data shared-mime-info
  xdg-user-dirs
The following NEW packages will be installed:
  cockpit cockpit-bridge cockpit-system cockpit-ws dbus-user-session dconf-gsettings-backend dconf-service glib-networking
  glib-networking-common glib-networking-services gsettings-desktop-schemas libcrack2 libdconf1 libglib2.0-0 libjson-glib-1.0-0
  libjson-glib-1.0-common libpolkit-agent-1-0 libpolkit-gobject-1-0 libproxy1v5 libpwquality-common libpwquality-tools libpwquality1
  libssh-4
0 upgraded, 23 newly installed, 0 to remove and 0 not upgraded.
Need to get 6709 kB of archives.
After this operation, 18.2 MB of additional disk space will be used.
Do you want to continue? [Y/n]
Next you need to modify who can log into Cockpit as by default root is forbidden and we need that at the moment. Use nano to edit the disallowed-users file and comment out the line that contains root.
# nano /etc/cockpit/disallowed-users
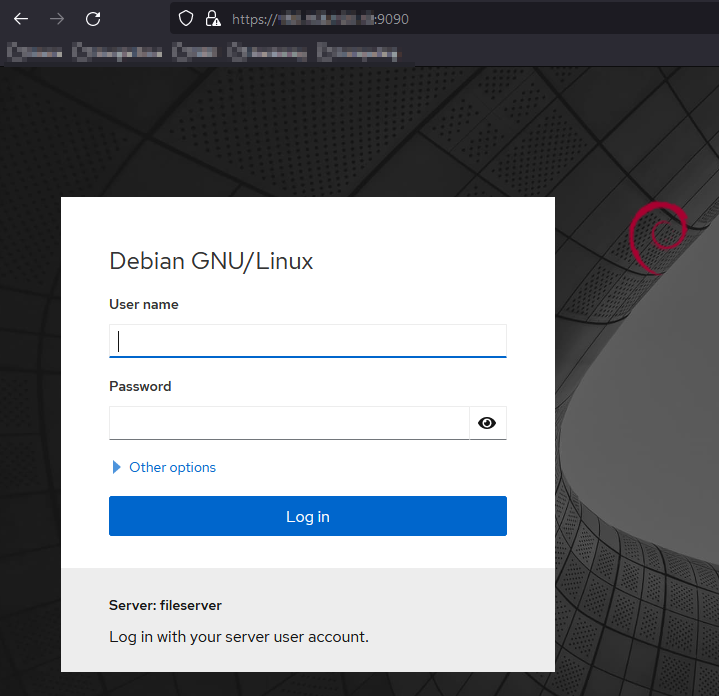
Open a browser and navigate to you new Cockpit install which is on port 9090.
Move Cockpit to Port 443
The official documentation for this process is here but briefly the steps are (logged in as root):
cd /etc/systemd/system/
mkdir cockpit.socket.d
cd cockpit.socket.d/
nano listen.conf
In listen.conf enter the following configuration
[Socket]
ListenStream=
ListenStream=443
Reload Cockpit
systemctl daemon-reload
systemctl restart cockpit.socket
Don’t forget to open up port 443 on the firewall for the file server or nothing will work 😉
Step 3 Installing Samba and Additional Modules
In order for Cockpit to manage file sharing it needs some additional modules produced by 45 Drives.
- Cockpit File Sharing – this provides a GUI to manage Samba (and NFS)
- Cockpit Navigator – provides a web based file explorer
- Cockpit Identities – manages accounts but also allows for the setting of Samba passwords (Samba has to use Windows style password hashes)
Download the latest release of all three packages to the container. From the package home page in GitHub, on right hand side will be a “Releases” heading, click the latest release which will take you to the download page. Select the .deb release and copy the URL. Switch back to the container command prompt and “wget” the download. An example is shown below, repeat this for all three packages
# wget https://github.com/45Drives/cockpit-file-sharing/releases/download/v3.3.4/cockpit-file-sharing_3.3.4-1focal_all.deb
Now install all three packages, this will also install a wide range of other packages.
# apt install ./*.deb
At the end of the process you’ll likely get a message indicating the .deb files couldn’t be removed. Simply remove them manually at the command prompt. I also got the following failure from the NFS set up. I’ve yet to look into this as I don’t plan on using NFS for now.
nfs-mountd.service is a disabled or a static unit, not starting it.
nfsdcld.service is a disabled or a static unit, not starting it.
Could not execute systemctl:  at /usr/bin/deb-systemd-invoke line 145.

Creating config file /etc/exports with new version

Creating config file /etc/default/nfs-kernel-server with new version
A dependency job for nfs-server.service failed. See 'journalctl -xe' for details.
invoke-rc.d: initscript nfs-kernel-server, action "start" failed.
* nfs-server.service - NFS server and services
     Loaded: loaded (/lib/systemd/system/nfs-server.service; enabled; preset: enabled)
     Active: inactive (dead)

Jul 04 17:19:33 fileserver systemd[1]: Dependency failed for nfs-server.service - NFS server and services.
Jul 04 17:19:33 fileserver systemd[1]: nfs-server.service: Job nfs-server.service/start failed with result 'dependency'.
Jul 04 17:19:33 fileserver systemd[1]: Dependency failed for nfs-server.service - NFS server and services.
Jul 04 17:19:33 fileserver systemd[1]: nfs-server.service: Job nfs-server.service/start failed with result 'dependency'.
Failed to start nfs-kernel-server, ignoring.
Switch back to the Cockpit web frontend and refresh the page. You should see the new modules appear in the left menu.
Step 4 Create a Sharing Dataset
Now we’ll create a new ZFS dataset on the host. I’m going to create a simple “scratch” space in my “tank” pool. You can add additional settings such as quota if needed but I’m keeping it simple for now. At a command prompt enter the following commands.
# zfs create tank/scratch
# zfs list
NAME           USED  AVAIL     REFER  MOUNTPOINT
tank          2.06M  42.9T      170K  /tank
tank/scratch   170K  42.9T      170K  /tank/scratch
Step 5 Bind a Directory – GUI Version – Not Recommended
This method of binding a directory to the container uses the Proxmox GUI but I don’t like the result. It ends up with an additional “subvol” directory under the dataset, as shown below, which I just don’t like and I believe it’ll cause issues down the road. The additional directory is created by the GUI when the mount point is created, there doesn’t appear to be any way to stop this from happening which is frustrating because it doesn’t seem to be necessary. The created directory is owned by the root user in the container (uid 100000). I left the rest of this step here because maybe you prefer this arrangement.
/tank/scratch# ls -la
total 2
drwxr-xr-x 3 root   root   3 Jul  5 15:49 .
drwxr-xr-x 3 root   root   3 Jul  2 18:18 ..
drwxr-xr-x 2 100000 100000 3 Jul  5 16:59 subvol-100-disk-0
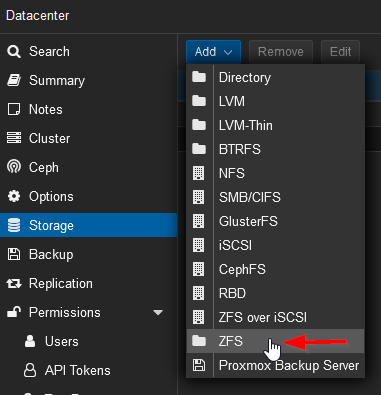
In the Proxmox GUI select the “Datacenter” in the left menu and then select storage. This will show you a list of the storage options currently available. Select Add and then ZFS.
A storage configuration dialogue window will open. Give it a sensible name such as “scratch” and select the ZFS pool that this storage should point too. Set the content to Container and make it thin provisioned.

With the storage created select the fileserver container in the left menu and then select Resources from the middle menu. At the top of the resources area select Add and then Mount Point. The mount point creation dialogue will open. The system has automatically chosen the first available mount point ID. For storage select the one we just created, scratch, and set a disk size. As this is a scratch volume I don’t want this included in backups so that should be unchecked.
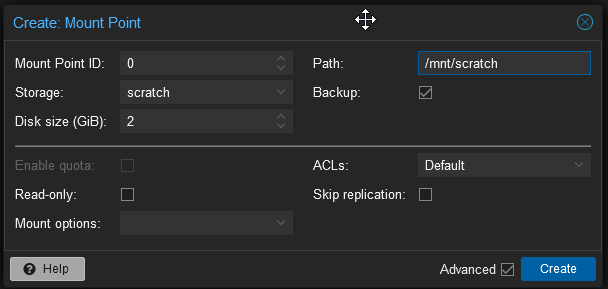
The disk size setting is a quota, not a limit. You can alter this value by selecting the mount point and then volume action from the top of the screen followed by resize. You can only increase the size of a volume. I’ve set a small size here so that I can test what happens when the quota limit is reached.
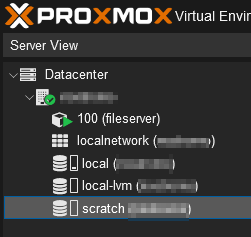
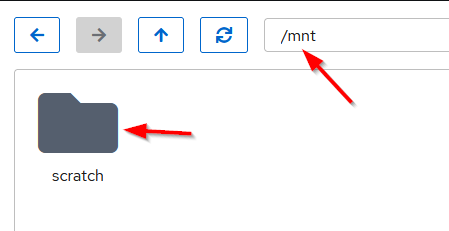
Interestingly, the creation of a mount point doesn’t require the container to be stopped or even restarted it can all happen on the fly. Start the container if necessary and open Cockpit. In Cockpit select Navigator and then the mnt directory, you should now see the scratch directory under mnt.
Step 5 Bind a Directory – Command Line Version – Recommended
What is shown below is not a great setup but it’ll get you going until a later step where we map users and tighten up the security. To be honest for a home lab setup where you trust all your users maybe this is acceptable. I want all the Samba users to be able to write into the root of the share so I’ll start by changing permissions on the /tank/scratch directory to give the world write permissions (yikes).
# chmod 777 /tank/scratch
Open the containers configuration file in nano
# nano /etc/pve/lxc/100.conf
Add the mp0 line to the bottom of the file, I’ve shown the whole configuration file below.
arch: amd64
cores: 2
features: nesting=1
hostname: fileserver
memory: 512
net0: name=eth0,bridge=vmbr0,firewall=1,gw=192.168.100.1,hwaddr=8E:BB:83:22:2D:35,ip=192.168.100.10/24,type=veth
ostype: debian
rootfs: local-lvm:vm-100-disk-0,size=8G
swap: 512
unprivileged: 1
mp0: /tank/scratch,mp=/mnt/scratch
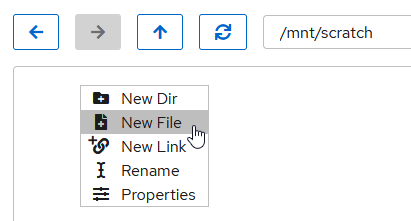
Start the container, login, and select Navigator from the left hand menu. Drill down into /mnt/scratch and then create a test file.
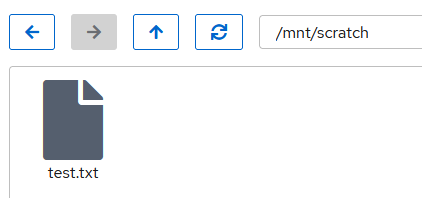
Switch back to the host command prompt and check that the file exists. Note the uid and gid for this file is 100000, this is the root user in the container as this container is running unprivileged. Essentially, the host adds 100000 to any container user or group ID so the files aren’t owned by any special users on the host.
/tank/scratch# ls -la
total 2
drwxrwxrwx 2 root   root   3 Jul  5 17:32 .
drwxr-xr-x 3 root   root   3 Jul  2 18:18 ..
-rw-r--r-- 1 100000 100000 0 Jul  5 17:32 test.txt
Step 6 – Create Container Users and Groups
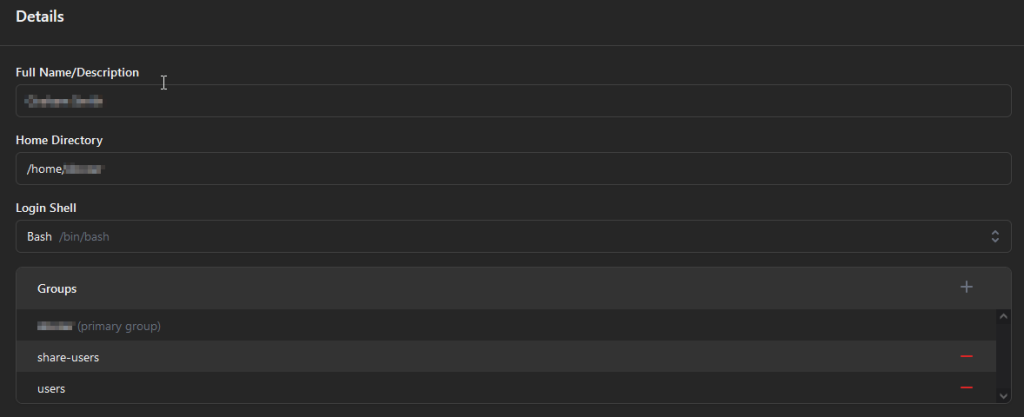
Select Identities and then users and create a new user for yourself. Set the login shell as without it you won’t be able to log in to Cockpit with this account. When prompted enter an account password. Don’t worry about groups for the moment, in a later article we’ll be using a group to control access to the share but for now we’ve set world write permissions.
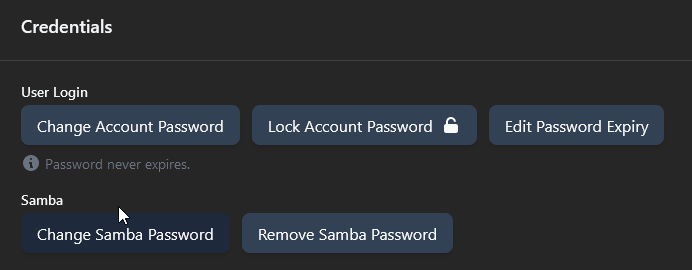
Due to the fact Samba uses Windows style passwords that aren’t compatible with Linux passwords you now need to set a separate password for Samba. This is at the bottom of the user page under credentials. For your own sanity I would make it the same as your Linux account password but it doesn’t have to be.
Step 7 Create Samba Shares
Still in Cockpit, select File Sharing from the left hand menu and scroll down to the Shares area. Click the + button to create a new share. Give it a sensible name and set the path to the bind mount directory in the container. Turn on the Windows ACLs setting. This overrides the Linux users and groups and tells Samba to manage file permissions. This is probably the option you want most of the time as mapping Windows permissions on to Linux doesn’t always work well.

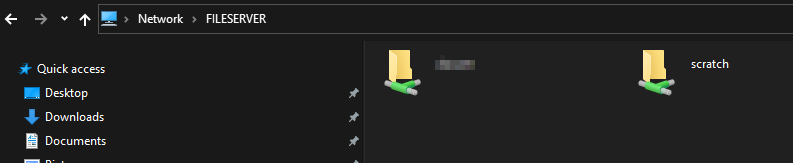
Now switch to Windows and visit \\FILESERVER in Explorer. You should see your home directory and the scratch directory.
When I first set this up the scratch share didn’t immediately show up. I restarted the container and went back into file sharing and it complained that the Samba server was misconfigured. Cockpit was able to fix the misconfiguration automatically and then the share showed up. I’ve seen this behaviour before so I assume something isn’t dotting it’s i’s when it should be.
This article has become quite long so I’m going to leave it there. The next article looks at setting up home shares.