This page describes the initial set up of my MikroTik RB751G router with a Thompson Gateway TG585v7 BeBox. Although that sounds quite specific these settings are should work with most or all ADSL routers that are in bridge mode and other RouterBoard devices.
I’ll point out right now that I’m by no means an expect in networking. Many moons ago I took a course in networking so phrases like “subnet mask” and default “gateway” don’t leave me looking blank, having said that there is plenty I don’t know. If this describes your level of networking knowledge read on, if you don’t understand what I just said I suggest you have a read of this book first.
You will need:
- The public IP address your ISP gave you. If you don’t have a static IP address get one you can probably make the interface pick up IP details using DHCP but I’ll not be covering that here. Further investigation seems to indicate that ehter1-gateway is set up for DHCP by default.
- The network mask (netmask) for your IP address.
- The gateway address for your IP.
Your ISP may have giving you a netmask as an IP like this: 255.255.255.0 for the RouterBoard configuration you’ll need to use the shorthand version which for that mask would be /24. In the case of Be the netmask is: 255.255.248.0 which works out as /21. If you are stuck working out what the shorthand version is from the IP style you can use the Windows calculator to convert 248 into binary.
There are actually only two steps that you need to complete in order to get going. I’m going to add a third step at the end to make the box play nicely with my existing network.
Step 1: Assign the Gateway IP
Out of the box the device doesn’t have an IP address configured for ether1-gateway so you need to create one and assign it to the interface. Using winbox select IP –> Addresses to open the Address List window.

Click the red plus which will open the New Address window. Enter your public IP address along with the short version of the netmask e.g 123.123.123.123/21. If you have entered this information correctly the Network field will be auto-completed. Now select ether1-gateway as the interface and click ok. The image above shows the completed task.
Step 2: Defining a Default Route
This is the step that through me for a while. I had assumed that the device would have a default route set which would be updated when the address was assigned but that wasn’t the case. Again under the IP menu select Routes to open the Route List window.
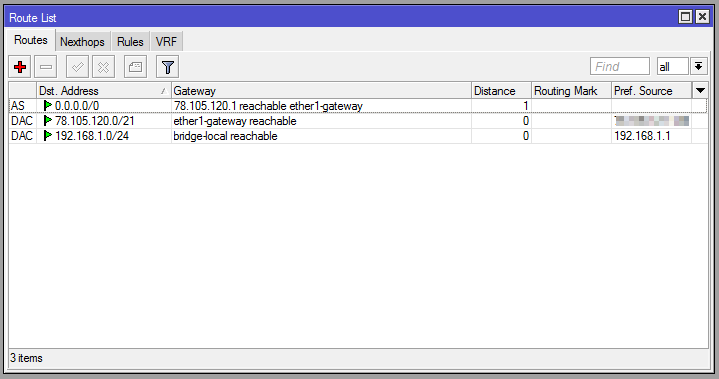
Click the red add button which opens the New Route window. Don’t modify the Destination Address, leave it as 0.0.0.0/0 (which means everything else), instead select the Gateway field and enter the gateway IP address given to you by your ISP. It will typically be the network address with a 1 at the end rather than a 0.
Step 3: Setting the Internal IP Address Range
The router comes configured to use the 192.168.88.0 address range internally. My internal network is set up to use the 192.168.1.0 range though. I had the choice of either changing the IP addresses of all the machines on my network or changing the router. I, oddly enough, decided to change the router.. As with step two this is done from the Address List page, just double click on the default configuration and set a different IP address and mask. You might find you briefly lose the connection with the router as it changes address.
You’ll probably also want to dive into the DHCP server settings and update the addresses that it’s giving out to machines on your network. Open the DHCP Server window then select Networks. Double click the default configuration and make appropriate changes. You’ll probably want to change the gateway (note this is your internal gateway so it’ll be something like 192.168.1.1) and if you run an internal DNS server you’ll need to set that IP as well.
Step 4: Setting the DHCP Pool Addresses
Setting the internal IP address range for the router will likely knock you off line if your machine is configured by DHCP because your machine will have an 192.168.88.0 address and the router is now running on 192.168.x.0. To correct this select IP –> Pool and change the default pool to whatever internal range of addresses you are using.
Next open up the DHCP Server page (IP –> DHCP Server) and switch to the Networks tab. Open the default configuration and change the address, gateway and DNS servers so that they are appropriate for your network. Your ISP will likley have given you two DNS servers to use.
Remember: these are the settings that are given to the clients running on the internal network that are configured by DHCP.
Step 5: Switching on the Wireless Network
Open the Wireless Tables page and double click on the wlan1 interface. On the wireless tab change the SSID of your network to something you recognize. Note that the wireless network is using the default security profile. Switch to the Security Profiles tab and double click the default profile. Select the dynamic keys mode and choose WPA2-PSK for the authentication type and aes for both Unicast and Group ciphers. Enter your pre-shared key in the WPA2 box.