I’ve recently been organizing some of the video files I have and a few of them are larger than I would prefer. It occurred to me that I’m somewhat familiar with HandBrake so I should probably re-encode them. I’ve used HandBrake before but, if I’m being honest, I didn’t really understand what I was doing. I made some bad choices and wasted a lot of time re-encoding things only to ultimately not like the results. There’s really no substitute for a good googling and reading the documentation but I thought it might be helpful to discuss some of the things I learnt on the way.
Quality Matters, But Not As Much As You Think
When you are setting up an encode in HandBrake you are presented, on the Video settings page, with a long slider to set the quality. Slightly confusingly lower numbers are higher quality and new users are tempted to slam it all the way to the right (RF=0). This is just about the worst thing you can do because most of the encoders will just output a massive file, many times larger than the source, with no improvement in quality. The lowest you typically would ever want to go is around the mid-teens and I typically encode with H.265 RF=24. If I really want good quality RF=20, by RF=18 you can barely see the improvement even in a side by side comparison.
Video Information
There’s a really handy tool called MediaInfo which you can just drop a video file onto and it’ll tell you all about it. It’s available in FlatHub.
Comparing Videos
There is an application called Identity (available in FlatHub) that can be used to compare videos (and I think images) side by side. This is a great tool for learning about what effect the HandBrake settings have on the output quality. Before I settled on an RF=24 for my H.265 encodings I ran off a few test encodings.
The example screen shot below is at 200% magnification and taken from a 46 minute video that weighed in a 2.7GiB. After re-encoding it was just 1.2GiB or less than half the original and I passed through audio which in this case was 5.1 DTS-HD (see below for more). I won’t lie and say that I can’t see a different in the two images below, the on on the left clearly has more detail and fewer artefacts. However, and this is the key point, when I was doing the test encodings and watching the video playing I couldn’t tell the difference. In fact the reason I went to find software to compare the videos side by side was because I kept becoming confused about whether I was watching the source or encoded files. The reality is your eye is really bad at picking up detail and you just won’t notice unless you crank the compression right up.

Audio
I chose to just pass through all the audio streams from my source material rather than try and re-encode them. The medium quality presets in HandBrake all seem to re-encode to stereo which would bug me. The higher quality presets mostly choose 5.1 AC3 which is a good choice. I’m happy to sacrifice a bit of space though and just pass through whatever is there. The settings for doing this I found to be less than obvious so I’ve included a screen shot below. All of the settings shown need to be set for full audio passthru to work automatically.
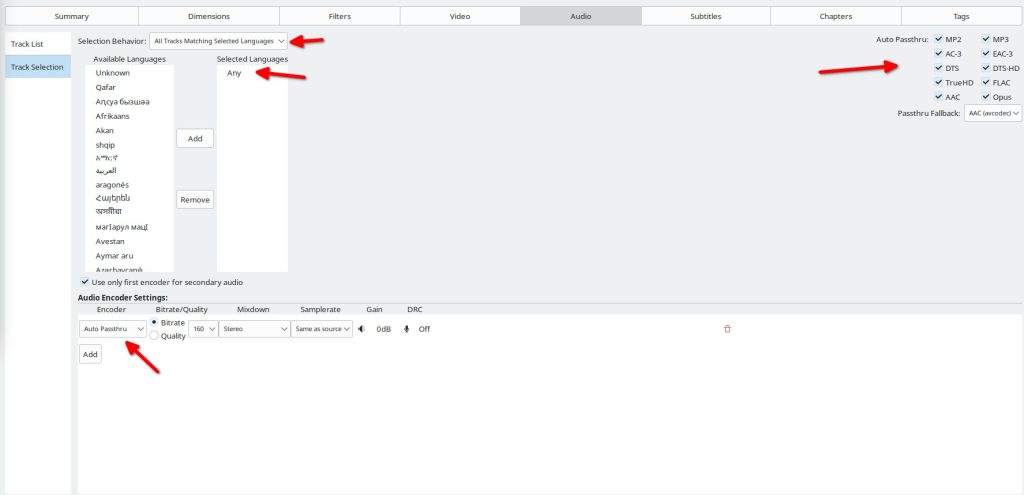
I will point out though that the settings shown above can result in a much larger file that you would expect. In the example encoding I showed above that came in at 1.2GiB probably around half of it is the audio tracks – DTS-HD is large e.g. 2MiB/s. Note that you can also deselect languages before the encoding starts if you don’t want them or you could set a language here and only pull in the ones you want. I, for example, usually remove commentary tracks.
Subtitles
As with audio I just want to passthru any subtitle tracks. Many of the HandBrake presets try and burn in foreign language subtitles. To explain quickly what that means, if the film is mostly in English but at one point a Klingon speaks you need subtitles for just that small section. These are forced subtitles and they are generally small. HandBrake can try and auto-detect them and burn them into the video stream. I dislike burnt in subtitles, all my devices can either handle subtitles or I don’t care. To force simple passthru of subtitles the following settings are used. As with audio passthru you need to make all the settings.
Note that this doesn’t stop you from manually removing subtitle tracks you don’t want before encoding starts. If you only want certainly languages select them here.

Encoders
Here’s where things get tricky. HandBrake supports a number of encoders but the only ones I feel are worth considering are H.264 (AVC, MPEG-4 Part 10), H.265 (HEVC, MPEG-H Part 2), and AV1. Not all codecs are supported by all playback devices and it’s support changes all the time. There is a compatibility matrix here (another here) which certainly helps but even that suggests you look at another page with more detailed information about exactly what settings are supported in your browser. Long story short though, H.264 8bit is very widely supported other than that it’s a bit hit and miss at the moment. I think the future is probably AV1 as it’s royalty free but right now (Sept 2023) it’s still not supported everywhere. Fortunately I think just about everything I use will support AV1. The one exception, I think, is my nVidia Shield box which as done me proud for years. As far as I know the Shield doesn’t have the hardware necessary to decode AV1 and certainly doesn’t have the processor power to do it in software.
In the future we’ll also have H.266 (VVC, ISO/IEC 23090-3, MPEG-I Part 3) to chose from although I suspect that will also require royalties which will mean there will be continued pressure to support AV1.
Video Encoder Settings
These are roughly the settings I use for the various different encoders. I might tweak them a little depending on the source.
Note that the preset setting goes a long way to determining how long the encoding takes. Slower typically results in a better picture quality.
AV1
This gives an amazing output but it takes forever to encode.
- Encoder : AV1 10-bit (SVT)
- RF : 32
- Framerate : Same as source
- Preset : 4
- Constant Framerate
- Constant Quality
- Tune : Noen
- Profile : main
- Level : auto
H.265
This gives a good output with reasonable encoding times.
- Encoder : H.265 10-bit (x.265)
- RF : 24
- Framerate : Same as source
- Preset : slow
- Constant Framerate
- Constant Quality
- Tune : None
- Profile : main10
- Level : 5.1
- More Settings : strong-intra-smoothing=0:rect=0:aq-mode=1:rd=4:psy-rd=0.75:psy-rdoq=4.0:rdoq-level=1:rskip=2