This is the third article in the series about using Proxmox as a NAS. For this article to make sense you’ll need to have a container set up and sharing host files via Samba similar to shat was set up in step one and two. In this article I’ll look at mapping container users onto Proxmox users which will allow me to solve the one big flaw in the setup so far: world writeable directories.
The aim here is to create new user accounts on the host for each family member and then map their user accounts into the containers so that any files created in bind mounts are owned by the correct host user. In other words if I (doozer) create a file on Windows via a Samba share I want it to be owned by my Proxmox user (doozer) on the host machine.
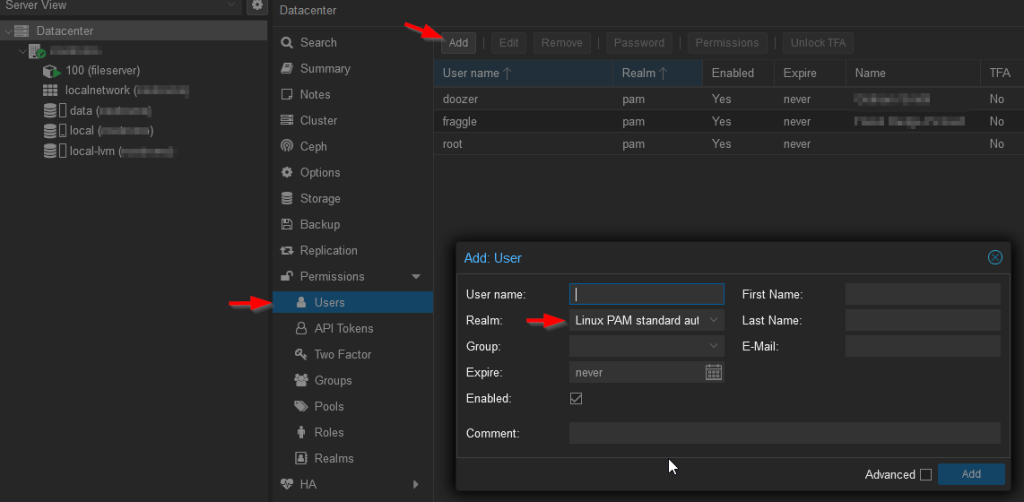
Add Users and Groups
Proxmox has, for our purposes, two types of user PAM and PVE. PAM users are regular Linux users and exist on an actual machine. They aren’t replicated by Proxmox, they have a home account (usually) and they can shell into the machine. PVE users are users of Proxmox, they are replicated but they don’t have a home account and can’t shell in. Essentially, if the user being created needs to access the actual host machine make it a PAM user, if they need to access Proxmox make them a PVE user. This video goes into more detail.
The upshot of this is we now need to create new PAM users for all family members on the Proxmox host. This is a two stage process, first you need to open a shell on the host and create a user as you usually would on a Linux machine with adduser and then you need to add them as a PAM user through the Proxmox frontend. Strictly speaking you don’t have to add them to the Proxmox frontend but I like to. I’ll have two users for now, doozer (that’s me, ID 1000) and fraggle (ID 1001).
# adduser fraggle
Adding user `fraggle' ...
Adding new group `fraggle' (1001) ...
Adding new user `fraggle' (1001) with group `fraggle (1001)' ...
Creating home directory `/home/fraggle' ...
Copying files from `/etc/skel' ...
New password:
Retype new password:
passwd: password updated successfully
Changing the user information for fraggle
Enter the new value, or press ENTER for the default
        Full Name []:
        Room Number []:
        Work Phone []:
        Home Phone []:
        Other []:
Is the information correct? [Y/n]
Adding new user `fraggle' to supplemental / extra groups `users' ...
Adding user `fraggle' to group `users' ...
Since most of the users I’ll add will only ever want to access the bind mounts I’m going to create a new group “lxc-users” for them to all be added to. This will allow me to assign that group to the bind mount directories. This is the key step that means the directories don’t have to be world writeable.
# groupadd -g 9999 lxc-users
Notice I’ve specified a GID for this group. I want it out of the way of any users and their personal groups. I can’t imagine I’ll have 9000+ users on the system any time soon so this should be high enough. Now add the users to the new group.
# usermod -aG lxc-users doozer
# usermod -aG lxc-users fraggle
Change the bind mount directory so that it’s owned by doozer:lxc-users and has 775 permissions.
/tank# ls -la
total 20
drwxr-xr-x  4 root root    4 Jul  6 17:31 .
drwxr-xr-x 19 root root 4096 May 18 16:17 ..
drwxrwxrwx  4 root root    4 Jul  6 17:43 home
drwxrwxrwx  3 root root    6 Jul 11 13:14 scratch

/tank# chown doozer:lxc-users scratch/
/tank# chmod 775 scratch/
/tank# ls -la
total 20
drwxr-xr-x  4 root   root         4 Jul  6 17:31 .
drwxr-xr-x 19 root   root      4096 May 18 16:17 ..
drwxrwxrwx  4 root   root         4 Jul  6 17:43 home
drwxrwxr-x  3 doozer lxc-users    6 Jul 11 13:14 scratch
How Container Mappings Work
Containers occupy a middle ground between running an application directly on the host and running it in a full virtual machine. A container essentially provides an entire operating system except for the kernel, applications in the container talk to the host kernel. This is great because it means containers are very light weight in terms of system resources. The problem is they come with some security considerations that are more challenging than a full virtual machine. The most obvious challenge is what do you do about the root user in the container? In a virtual machine they are root only for that machine. In a container, that is sharing resources with the host, what are they? Obviously you can’t have a container root user having host root privileges so the LXC system locks down the users in the container. One of the ways it does this is by mapping container users to high numbered users on the host. So for example root, user 0, in the container, becomes user 100000 on the host. This is most noticeable when host folders are bind mounted into the container. Assuming the mounted folder has sufficient permissions files will be written with user ID’s starting at 100000.
The problem with this user mapping is that when you bind mount a folder (with let’s say: mp0: /tank/scratch,mp=/mnt/scratch) the container probably won’t be able to write into /tank/scratch thus rendering the mount almost useless. The problem is the container is running as root but it’ll write files on the host machine as UID 100000, a user not known on the host. As we saw above the directory /tank/scratch is owned by root:root on the host, this is not who the container is writing as. One solution which will work but is not recommended is to just give /tank/scratch 777 permissions, in other words make it world writeable. For a production environment this is not acceptable but for a home setup I would maybe live with it. The solution I’m going to use is user and group mappings.
Setting up user and group mappings requires modifying three files and understanding a confusing mapping syntax. Fortunately there’s at least one online tool for creating the settings you’ll need. You can help your sanity by making sure that users on the host and in the containers have the same UID and GID, these can be specified at creation time if necessary. Creating the users in the same order should also ensure this though. In other words if doozer is UID 1000 on the host make sure they are UID 1000 in the container as well.
Configuring the Host
The host needs to be told which UID’s and GID’s it’s allowed to map onto the container. It does this by referring to the /etc/subuid and /etc/subgid files. By default both files usually contain only this:
root:100000:65536
What this says is that the user/group root can map UID/GID starting from 100000 and for the next 65536 ID’s. Since Proxmox starts containers as root that means processes started as root, UID 0, in the container will be mapped to UID 100000 on the host. If you’ve got Cockpit installed in a container, as per the earlier articles, then running top on the host and then logging into Cockpit will probably show you something like this:
    PID USER      PR  NI    VIRT    RES    SHR S  %CPU  %MEM     TIME+ COMMAND
  29908 100103    20   0  525356   5888   4608 S  12.3   0.0   0:02.50 cockpit-tls
  29939 100000    20   0  310456   9976   6536 S   1.0   0.0   0:00.30 cockpit-bridge
   1251 root      20   0  227512   2304   2048 S   0.7   0.0   0:00.10 lxcfs
  29912 100104    20   0  161068   7296   6016 S   0.7   0.0   0:00.18 cockpit-ws
   1629 root      20   0  606772  67900  54224 S   0.3   0.2   0:05.14 pmxcfs
Notice the UID column, the Cockpit processes are running with high UID’s.
If you want the host to map a host user into the container you have to tell it explicitly that it’s allowed by adding a line like this to /etc/subuid:
root:1000:1
This allows the root user on the host (who we’re starting the container with) to map the UID 1000 into the container and to stop there. If we changed the final 1 to a 5 we could map UID’s from 1000 to 1004 e.g. 5 UIDs. The syntax and settings are the same for the /etc/subgid file.
Additional Notes
You might also see other entries in the default /etc/subuid and /etc/subgid files such as:
doozer:165536:65536
These are created by Proxmox for use by user created containers. You can just leave them in there or remove them, it doesn’t matter. We’re creating containers with Proxmox which uses root so that’s the only entry we care about.
You might be tempted to map root or UID 0 into a container to avoid all permissions problems but don’t this is a massive security hole and defeats the point of using a container in the first place.
Configuring the Container
Now you need to tell the container how to map users. So open the configuration file /etc/lxc/pve/100.conf (changing the container number as appropriate). At the bottom of the file you’ll need to add something like this:
lxc.idmap: u 0 100000 1000
lxc.idmap: g 0 100000 1000
lxc.idmap: u 1000 1000 1
lxc.idmap: g 1000 1000 1
lxc.idmap: u 1001 101001 64535
lxc.idmap: g 1001 101001 64535
Once you’ve looked at a couple of example configuration files this isn’t as bad as it first appears. For a start we can split the file by user “u” and group “g”. The syntax is identical so I’ll only discuss users.
Looking at the first line this tells the system that starting from UID 0 in the container, map to 100000 and continue for 1000 UID’s. Line 3 tells the system that UID 1000 in the container should map to 1000 on the host and do this for one UID. Line 5 then just maps the remaining users in the container starting at 101001 for 64535. This last number is easy to screw up which is one reason why I recommend using a file generator.
Once you’ve modified these files you need to restart the container.
Tweaking the Container
You should now find that if you access the scratch share on Windows using your account (doozer) that you can write files just file. If you try and access the shave as fraggle though things aren’t quite so good. If you remember above we owned the /tank/scratch directory with doozer:lxc-users, reduced the access to 775. and we put fraggle into the lxc-users group on the host. What we didn’t do though was create that group in the container or map the group into the container.
Fortunately both of these are very similar to things that we’ve already done above so without further ado here are the final mapping files. Notice /etc/subgid has a new entry that maps the lxc-users group into the container. Restart the container after making these changes.
*** /etc/pve/lxc/100.conf ***

...snip...

mp0: /tank/scratch,mp=/mnt/scratch

...snip...

lxc.idmap: u 0 100000 1000
lxc.idmap: g 0 100000 1000
lxc.idmap: u 1000 1000 1
lxc.idmap: g 1000 1000 1
lxc.idmap: u 1001 1001 1
lxc.idmap: g 1001 1001 1
lxc.idmap: u 1002 101002 64534
lxc.idmap: g 1002 101002 8997
lxc.idmap: g 9999 9999 1
lxc.idmap: g 10000 110000 55536

*** /etc/subuid ***

root:100000:65536
root:1000:1
root:1001:1

*** /etc/subgid ***

root:100000:65536
root:1000:1
root:1001:1
root:9999:1
Now add the lxc-group to the container and add the users to the group
root@fileserver:~# groupadd -g 9999 lxc-users
root@fileserver:~# usermod -aG lxc-users doozer
root@fileserver:~# usermod -aG lxc-users fraggle
As soon as you add fraggle to the group you’ll find they are able to write files to the root of the share.
Additional Tidying Up
If you’ve followed this series from the first article you’ll need to do some tweaking and tidying up. For example, if you check the the home directories created so far on the host machine you’ll probably find they are owned by high numbered users still, you’ll need to make user of chown etc to correct ownership and permissions. This is a one time correction, any new users will have their home directories created correctly. In an ideal would we would have set up the mappings first but I felt it was easy to learn in this order.
Conclusion
Overall this set up works but it feels a little bit fragile. When adding a new user or group you have to consider the ID that will be used to avoid creating a tangled mess of mappings. Ideally I want all of the ID’s aligned across containers. It’s not the end of the world if the ID’s don’t line up but it could become a mess. In terms of what this setup brings it’s not a huge amount what what I’m doing. The host doesn’t need access to the files and virtual machines will access the files over SMB. It is nice to have all the files owned by users and groups that exist in the host though. I suspect it’ll pay dividends as the Proxmox install becomes more complex.