In this article I’ll be creating a new virtual machine that will run Docker. This machine will eventually host a number of services for my family such as a music server and photo viewing, but that’s for another day.
BIOS Settings
Some of the information here is specific to my motherboard (MSI B550 Gaming Gen3 – which has the worlds worst BIOS configuration system) but the general idea is the same for all BIOSes.
First things first, if you have an MSI motherboard their BIOS interface is the worst. Don’t, under any circumstances, switch to what they call EZ-mode as it’ll silently change a number of settings you’ll make and all your virtual machines will stop working because it turns off the virtualization settings. In fact if your running Proxmox it won’t even boot because it’ll turn on Secure Boot which Grub doesn’t work with.
Trun on SVM Mode – this is Secure Virtual Machines and is required for KVM to run virtual machine. It took me an age to figure out this was the setting I needed because I thought it would be called VT-X or AMD-V, which is what I’ve always known it as. In advanced BIOS mode, select the OC (overclocking) settings and then Advanced CPU Configuration and you should see the SVM Mode setting. Set it to enabled.
Turn on IOMMU – In advanced BIOS mode, select the OC (overclocking) settings and then Advanced CPU Configuration then AMD CBS and you should see the IOMMU setting. Set it to enabled. I’m not sure this setting is strictly needed but turning it on doesn’t hurt anything.
Turn off Secure Boot – In advanced BIOS mode, select the Settings settings (I don’t know what else to call them) and then Advanced followed by Windows OS Configuration. Under that heading you should find Secure Boot which should be disabled because Grub can’t load modules when it’s switched on.
Create a new Minimal Debian VM
For a VM like this you want the bare minimum that will work. Compared to containers, VM’s are fairly heavy on system resources so I want to get the most out of it. You might be wondering why I don’t just use a container and it’s because they aren’t recommended for running Docker. To be honest a lot of people seem to be running Docker in containers just fine but I want a solution that I can set up and forget about.
Start by going to the Debian home page and selecting download. If you’re running Proxmox on x86 you’ll want the debian-12.0.0-amd64-netinst.iso at the time of writing. Pick that latest version that is available for your architecture. Right click on the download link and copy it, we’ll give this address to Proxmox.
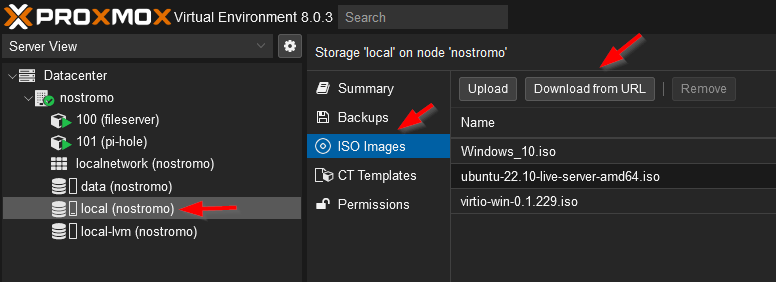
Somewhere on your Proxmox system you’ll have storage for ISO images. In my fairly default install it’s called local and it’s under the one server I have available. Select IOS Images from the middle menu and then click Download from URL
The Download from URL dialogue will open, paste in the URL you just copied and click Query URL. You should have something like this:
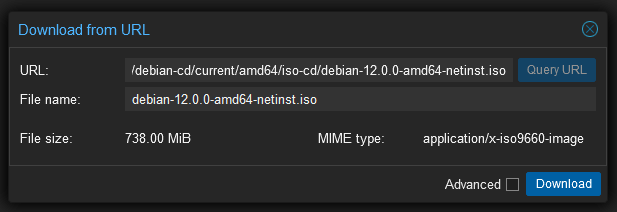
Click download and wait while the image is downloaded. This is a net installation image so I’ll require an active network connection during installation. Close the dialogue when the download is complete.
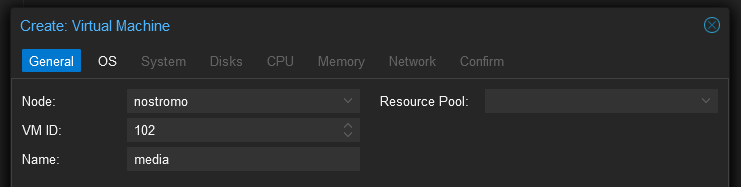
Now that you have the ISO it’s time to install the VM. Click the Create VM button at the top of the Proxmox window. The create virtual machine dialogue will open. On the first page, General, you’ll probably just want to give the VM a name, I’ve called mine “media”.
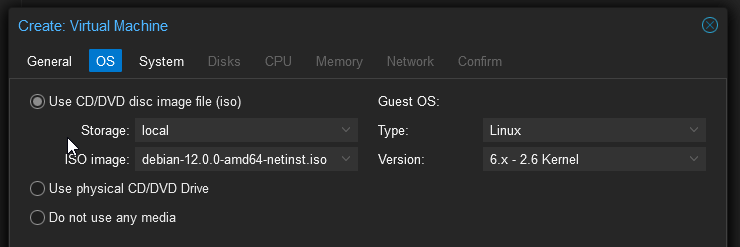
On the OS page select the ISO image you just downloaded, the other settings will probably be correct but give them a quick check.
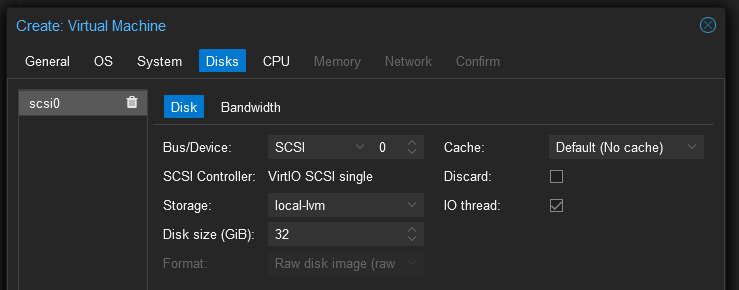
There are no changes to make from the default on the System page. On the Disks page Proxmox will offer to set up a single 32GB disk by default, this will be fine as we won’t be storing much data on this drive. The only change I wanted to make was to store the disk on the local-lvm storage rather than data which was selected initially. On my server local-lvm is backed by a M.2 drive where as data is my spinning rust ZFS array.
For the CPU settings leave it at 1 socket and choose 2 cores, this should be enough but it’s trivial to change in the future if necessary. Leave the type set as the default value. Bump up the memory to 8192MiB, this is probably enough but it might need more in the future. My server currently only has 32GiB so I’ve got to be a bit careful how much I give to VM’s. With the networking just leave the default settings. Finally on the confirm page click finish.
After a moment you’re new VM will be set up. Select it in the Server View menu and then click start. Select the console in the machine menu and you should see the installer menu. You have an option of graphical install or regular install along with a few other options. Pick “Install” to start the process. Most of the installer is very self explanatory so I won’t detail it here, I’ll just pick up on the points where you need to make a less than obvious choice.
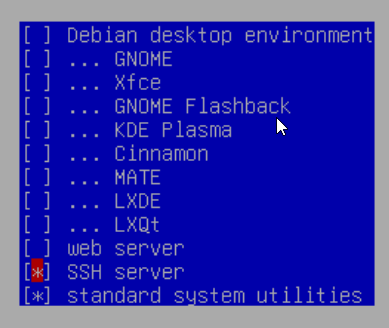
Set the hostname to “media”, the same as the VM name, anything else will just be confusing. For domain name you can make something up if you want but if you have Pi-hole set up as discussed in an earlier article then you can easily run your own domain on your local network. Use the guided disk partitioning and just use the whole disk cramming all files in the one partition – it’s not elegant but it is simple. The big choice comes at the software selection stage. Since this is a headless server you don’t want any desktop environments selected so deselect “Debian desktop environment” and “Gnome”. Select “SSH server” as that will be useful for maintenance.
Only a couple of steps remain after this selection, install Grub on the main drive and then reboot the machine. The machine should reboot quickly as there’s almost nothing running on it. Log in with the root account and you’re done. During boot the VM appears to top out at 2GiB of ram usage but after boot that drops down to a around 200MiB, in terms of processor usage it peaked at 30% during boot. So far so good.
Configure the Debian VM
You should find that the server works after installation but it will require a bit of configuration, most importantly it should have a positively set IP address rather than one from the general pool. Since this server isn’t part of the key infrastructure of my home network I’ll assign it an IP address via DHCP, the important point is that it’s IP address doesn’t change. Key machines like the Proxmox host and the DNS server always have statically assigned IP addresses.
Set An IP Address
Open an SSH shell to the media server. Now run the command ip a.
root@media:~# ip a

1: lo: <LOOPBACK,UP,LOWER_UP> mtu 65536 qdisc noqueue state UNKNOWN group default qlen 1000
    link/loopback 00:00:00:00:00:00 brd 00:00:00:00:00:00
    inet 127.0.0.1/8 scope host lo
       valid_lft forever preferred_lft forever
    inet6 ::1/128 scope host
       valid_lft forever preferred_lft forever
2: ens18: <BROADCAST,MULTICAST,UP,LOWER_UP> mtu 1500 qdisc fq_codel state UP group default qlen 1000
    link/ether 57:59:9c:4d:f7:66 brd ff:ff:ff:ff:ff:ff
    altname enp0s18
    inet 192.168.1.100/24 brd 192.168.100.255 scope global dynamic ens18
       valid_lft 333sec preferred_lft 333sec
    inet6 fe80::5459:8cff:fe4d:e766/64 scope link
       valid_lft forever preferred_lft forever
This will show you the current IP address and more importantly the MAC address of the VM’s network interface. Use this MAC address to assign an IP address to the VM and then restart the server with systemctl reboot. While you’re waiting for the VM to reboot make a DNS entry in your Pi-hole for the media server on it’s new IP address. For completeness install the net-tools package and examine the contents of /etc/network/interfaces.
Tell the Machine Who It Is
Now edit the /etc/hosts file. The server will run fine if you don’t edit this file but it’s better if the server knows it’s own public IP address.
nano /etc/hosts
127.0.0.1       localhost
192.168.1.13  media.example.co.uk  media

# The following lines are desirable for IPv6 capable hosts
::1     localhost ip6-localhost ip6-loopback
ff02::1 ip6-allnodes
ff02::2 ip6-allrouters
Edit the /etc/hostname file if necessary, you should have set this during the install. Reboot the machine again and run hostname followed by hostname -f. These should give the hostname and then the fully qualified hostname (e.g. with a domain).
Perform an Update
Start by quickly checking the /etc/apt/sources.list file. Just make sure the updates repository is enabled, if it is you’re good to go. At some point you might like to include backports but at the time of writing Debian 12 is very new and we want maximum stability. assuming everything is looking good perform an upgrade.
apt update && apt upgrade
That’s all there is to it. To save yourself some time and effort in the future you could clone this on Proxmox but that’s an advanced topic. To be honest I create VM’s so infrequently there’s usually a new version available but they time I come to use my clone. Next I’ll look at installing Docker and Portainer.
Optional Additional Steps
Automatic Updates
You might like to configure automatic updates which I have a page about here: Automatic Updates on Debian.