If you have a SQL Server that is accessible in anyway outside your network you really should ensure that connections to it are encrypted. In this article I will do my best to give a comprehensive guide on how to configure SQL Server 2017 to use free certificates from Let’s Encrypt.
Be warned, this is not going to be an easy process and this article will be very heavy on technical detail some of which I may not fully understand myself – I’m a software developer doing my best to look like a sys admin.
I know this has been done before though based on two posts on the subject, one by Daniel Hutmacher and the other by Jan Pieter Posthuma. I am eternally grateful to them for their help and I hope they don’t mind me borrowing and adapting what they have done. Why write my own article if two already exist? Daniel covered this subject back in 2017 and things have moved on a bit since then, his article was an excellent starting point for me though.
A Quick Introduction to Acquiring a Certificate
When in comes to certificates you’ve got four routes to acquiring one: self sign, set up your own CA, pay a CA or Let’s Encrypt. The first two, self sign and setting up your own CA, aren’t really an option for most people. Self signing means validation errors or a lot of work installing certificates. Setting up a CA is a lot of hassle you really don’t need. Paying for a certificate is a viable route but the costs are going to mount up quickly and you’ve got ongoing manual work.
Let’s Encrypt is free service that was designed to secure web servers but it issues regular SSL certificates so they can be used to secure any server with a little work. One big difference between pay-for certificates and Let’s Encrypt certificates is that the latter are only valid for 90 days. This forces you down the route of automation which is a good thing but it does mean a fair bit of upfront configuration.
My Setup
- SQL Server 2017 Standard Edition running on Windows Server 2016 (I’ve also tested this with SQL Server 2017 Developer Edition on Windows 10).
- SQL Server is running stand-along, there is no clustering, etc.
- Apache is installed and configured to serve content on ports 80 and 443.
- I have a public DNS A-record pointing to my server that matches the machine name I’ll be using (no IPv6 configuration).
Setting the Machine Identity
SQL Server will only use a certificate if the “Subject” field of the certificate matches the full computer name (host name) and this should match the value in the DNS record for the server.
To set the full computer name load Control Panel > System then select Change settings.
A System Properties window will appear. On the Computer Name tab press the Change… button. Set the computer name appropriately. Important, you also need to set the Primary DNS suffix of the computer, this is done by clicking the More… button.
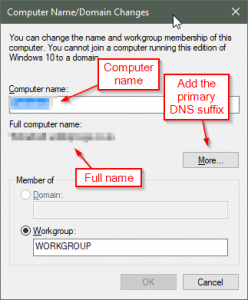
See the note at the end, this isn’t entirely necessary.
Requesting a Certificate From Let’s Encrypt
This actually turned out to be one of the easier parts of the process especially when I figured out how to get the certificate in the format I needed. Since I was also looking at securing Apache I covered the whole process of actually acquiring a certificate in another article here. The only difference to that process is that when WACS asks you how you’d like to store the certificate select IIS Central Certificate Store, like this:
 1: IIS Central Certificate Store
 2: Windows Certificate Store
 3: Write .pem files to folder (Apache, nginx, etc.)
 C: Abort

 How would you like to store this certificate?: 1

 Path to Central Certificate Store: C:\somepath\ccs
This is necessary to get the PFX file that is used by SQL Server. The Windows Certificate Store option adds the certificate to the store in a way that means it can’t be used by SQL Server (you can’t give it permission to access the certificate) and the PEM files aren’t usable by SQL Server (but they are by Apache).
Note that when you specify the option to add the certificate to the CCS it will ask you if you want to secure the certificate with a password. If you specify a password you will likely have problems automatically renewing the certificate as there doesn’t seem to be an automatic way to provide the password to the tools that work with the certificate.
Manually Adding the Certificate
Start the management console and add the certificates snap-in.
- Press Win+R and enter “mmc”
- File > Add / Remove Snap In
- Select Certificate then Add >
- Choose “Computer Account” from the options dialog.
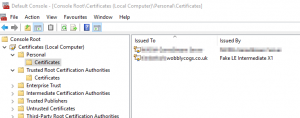
Locate Console Root > Certificates (Local Computer> > Personal > Certificates. Right click on it and select All Tasks > Import…. Complete the import wizard pointing it at your PFX file. You should have something that looks like this at the end:
Now right click on the certificate and select All Tasks > Manage Private Keys…. This will open a security settings dialog where you need to give the SQL Server service account full control.
Setting the Certificate in SQL Server
The SQL Server Configuration Manager will be required during this process it used to have it’s own application but in SQL Server 2017 it’s now only accessible though an MMC snap-in. Start up MMC and add it to the console.
In the SQL Server Configuration snap-in dill down to SQL Server Network Configuration > Protocols for [instance_name]. Right click and select Properties. Switch to the Certificate tab and in the Certificate drop down select the certificate you want to use (there will probably only be one). Press Ok. This dialog also allows you to force encryption to always be on if you need that. Restart the SQL Server service to make it pick up the new certificate.
Testing the Connection
Open SQL Server Management Studio (SSMS) and in the Connect to Server dialog enter the FQDN of the server in the Server Name field. Press the Options >> button at the bottom right to access more connection options. On the Connection Properties tab select Encrypt Connection and then press the Connect button.
If you are running a fake certificate as I am currently you’ll get a warning stating “The certificate chain was issued by an authority that is not trusted”. This means the encryption is working but the certificate itself doesn’t have a chain of trust. While testing you can prevent that error message by selecting the “Trust server certificate” option in the Connection Properties. For a production system DO NOT use a certificate without a chain of trust.
Important Gotcha
When you open SSMS on a machine local to the SQL Server it will typically default to using just the machine name in the Server Name field. If you attempt to connect securely using just this it will give you the error message “The target principal name is incorrect”. You must use the FQDN.
Manually Renewing the Certificates
The WACS application will install a task to renew certificates as they get close to expiry (typically at 60 days) but if you want to force the matter you can issue a command such as this to force the immediate renewal of the certificate:
.\wacs --test --verbose --force
This will start WACS in interactive mode and the force flag will make it ignore existing certificate expiry dates. Just follow the process to renew the certificate you are testing against. You can check that the certificate changed by comparing the thumbprints. This is useful while testing the set up and scripts.
Automatic Renewal
As mentioned above WACS will create a scheduled task which will try to renew the certificate everyday (at 9AM by default so you’ll probably want to change that). The command it runs is :
wacs.exe --renew
Check that this task runs correctly by opening Task Scheduler and running it on demand. If you open Event Viewer you should see it report what it has done in Windows Logs > Application. Typically you’ll see an entry for the application starting and then one for each certificate that gets checked.
Once you have the renewal task set up you need to run another task that will update SQL Server if the certificate has changed. The script below will accomplish this task for you. I started with Daniels script but ended up basically re-writing it to deal with the way WACS now delivers certificates. While I am a software developer this is the first PowerShell script I’ve written longer than a couple of lines so there is probably ample room for improvement.
# ~~~~~~ SETTINGS YOU NEED TO CHANGE ~~~~~

# Full path to the PFX certificate file. This is the Central Certificate Store
# location that you gave when the certificate was created.
$certFile = 'C:\somepath\ccs\mysqlserver.example.co.uk.pfx'

# This is the location of the registry key that contains the thumbprint of the
# certificate that SQL Server is currently using. This path will change slightly
# depending on which version of SQL Server you are using and the name of the instance.
$regpath = 'Registry::\HKEY_LOCAL_MACHINE\SOFTWARE\Microsoft\Microsoft SQL Server\MSSQL14.MSSQLSERVER\MSSQLServer\SuperSocketNetLib'

$subjectName = 'timberbolt.wobblycogs.co.uk'

# The SQL Server service account that will need permissions on the certificate
$sqlServerServiceAccount = "NT Service\MSSQLSERVER"

# The names of the services that will be restarted after a new certificate is installed. These
# can be found in the services config window.
$sqlServerServiceName = "MSSQLSERVER"
$sqlServerAgentServiceName = "SQLSERVERAGENT"
$sleepTime = 10

# The certificate store location - you probably don't need to touch this
$certStoreLocation = "/LocalMachine/My"

# ~~~~~~ DON'T TOUCH ~~~~~

# The thumbprint of the certificate SQL Server is currently using.
$currCertThumb = (Get-Itemproperty -Path $regpath).Certificate

# The thumbprint for the certificate we're testing. This magic dot notation was explained here:
# https://stackoverflow.com/questions/22408150/get-thumbprint-of-a-certificate
$newCertThumb = (Get-PfxCertificate -FilePath $certFile).Thumbprint.toLower()

Write-Host "Current Certificate Thumprint (from SQL Server): $($currCertThumb)"
Write-Host "New Certificate Thumbprint: $($newCertThumb)"

if( $currCertThumb -ne $newCertThumb ) {
	Write-Host "Certificate has changed - updating"

	# Used to check for the presence of the current and new certificates in the store. Depending on what
	# state the system is currently in one or other of the certificates might be missing or already
	# installed.
	$currCertificate = Get-ChildItem cert:$certStoreLocation | Where thumbprint -eq $currCertThumb
	$newCertificate = Get-ChildItem cert:$certStoreLocation | Where thumbprint -eq $newCertThumb


	# Remove the current certificate if it's available (covers the case where it was removed manually)
	if( $currCertificate -ne $null ) {
		Write-Host "Removing current certificate"
		Get-ChildItem Cert:$certStoreLocation/$currCertThumb | Remove-Item
	} else {
		Write-Host "The current certificate was not found in the store!" -ForegroundColor red
	}

	# Import the new certificate into the certificate store if it's not already there.
	if( $newCertificate -eq $null ) {
		Write-Host "Installing new certificate"
		Import-PfxCertificate -CertStoreLocation cert:$certStoreLocation -Exportable -FilePath Filesystem::$certFile
	} else {
		Write-Host "A certificate with the same thumbprint as the new certificate already exists. Skipping installation." -ForegroundColor red
	}

	# Get the new certificate
	$newCertificate = Get-ChildItem cert:$certStoreLocation | Where thumbprint -eq $newCertThumb

	# Find the file that holds the private key.
	$rsaCert = [System.Security.Cryptography.X509Certificates.RSACertificateExtensions]::GetRSAPrivateKey($newCertificate)
    $fileName = $rsaCert.key.UniqueName
    $path = "$env:ALLUSERSPROFILE\Microsoft\Crypto\RSA\MachineKeys\$fileName"
	Write-Host "Private Key Path: $($path)"

	# Get the existing permissions for the private key and then create a new access rule and assign it.
	# Note, this doesn't appear to give permissions in the same way as a doing it manually through the MMC
	# using All Tasks > Manage Private Keys... - the permissions don't show up.
    $permissions = Get-Acl -Path $path
    $accessRule = New-Object System.Security.AccessControl.FileSystemAccessRule $sqlServerServiceAccount, fullcontrol, allow
    $permissions.AddAccessRule($accessRule)
    Set-Acl -Path $path -AclObject $permissions

	# Update the registry entry to reflect the new thumbprint.
	Set-ItemProperty -Path $regpath -Name 'Certificate' -Value $newCertThumb

	# When the certificate is updated the SQL Server needs to be restarted.
	# If the SQL Server Agent is running it needs to be stopped first and then restarted.
	Stop-Service $sqlServerAgentServiceName
	sleep $sleepTime
	Restart-Service $sqlServerServiceName
	sleep $sleepTime
	Start-Service $sqlServerAgentServiceName
} else {
	Write-Host "Certificate matched - exiting"
}
Schedule this script to run a few minutes after the WACS renewal script with maximum privileges so that it can set up security on the certificate and restart services. I struggled a little to get this script to run, it ran fine from a PowerShell prompt (running as administrator) but Task Scheduler just didn’t run it. In the end the secret sauce that made it work was the ExecutionPolicy switch being set to unrestricted. I think the problem was the PowerShell not running the script because it was unsigned. The complete Task Scheduler settings were:
Program / Script: C:\Windows\System32\WindowsPowerShell\v1.0\powershell.exe
Arguments: -ExecutionPolicy Unrestricted -WindowStyle Hidden -file ReplaceSQLServerCert.ps1
Start In: [folder containing the script]
Verification
There’s a couple of things you can do to verify your set up. If you fire up SSMS and execute this query it should give you the thumbprint of the certificate you’ve got installed on the server:
EXEC sp_readerrorlog 0, 1, 'encryption'
You can also execute this query to check the encryption state of all the connections:
SELECT session_id, net_transport, client_net_address, local_net_address,
       local_tcp_port, auth_scheme, encrypt_option
FROM sys.dm_exec_connections
The encrypt_option should be true for all connections.
Final Thoughts
This process is not for the faint of heart but it’s entirely possible to secure SQL Server using Let’s Encrypt certificates. There’s a couple of areas of the process that I feel are a little weak but I’m willing to live with them for now. I don’t particularly like the fact we have restart SQL Server every 60 days, it gets enough restarts due to Windows updates anyway but I don’t see any way around that. More concerning though is that I feel a little exposed relying on WACS to get the certificate. WACS is mature and probably won’t change significantly in the near future but this set up is entirely dependent on the central certificate store option.
If you see any issues please leave a comment, I don’t pretend to be an expert at this so there might well be issues.
Notes
Setting the Full Machine Name isn’t Strictly Necessary
It occurred to me while I was writing the script to update the certificate automatically that there was nothing stopping me from just specifying any certificate in the registry. My suspicion was that it was only the SQL Server front end what was checking the Subject of the certificate (aka Common Name) against the FQDN of the machine and it looks like that suspicion was correct.
I did some digging and turned up this Stack Overflow post on the subject. I had a machine with a default name (e.g. WIN-AKJFNBD) that didn’t match the name I wanted to connect with so I generated a certificate and installed it manually by editing the appropriate registry entry. The certificate works fine. It still doesn’t show up in the SQL Server Configuration Manager but I can’t say I’m surprised by that.
How do I Know the Certificate was Loaded?
If you check in the SQL Server error log shortly after a restart you’ll see the line:
The certificate [Cert Hash(sha1) "ABC123..."] was successfully loaded for encryption
See Also
- https://sqlsunday.com/2017/11/22/encrypting-tds-with-letsencrypt/ – Daniel Hutmacher’s article on this task.
- https://azurebi.jppp.org/2016/01/23/using-lets-encrypt-certificates-for-secure-sql-server-connections/ – Jan Pieter Posthuma’s article on this task.
- https://docs.microsoft.com/en-us/sql/database-engine/configure-windows/enable-encrypted-connections-to-the-database-engine?view=sql-server-2017 – Official guide to installing a certificate on SQL Server.
- https://letsencrypt.org/ – Let’s Ecrypt website.
- https://github.com/PKISharp/win-acme – WACS site (wiki)
- https://blogs.msdn.microsoft.com/kaushal/2012/10/11/central-certificate-store-ccs-with-iis-8-windows-server-2012/ – Information on Central Certificate Store.
- https://port135.com/2019/05/16/what-is-centralized-certificate-store-ccs-how-to-use-it/ – Information on Centralized Certificate Store.
- https://blogs.msdn.microsoft.com/sqlserverfaq/2016/09/26/creating-and-registering-ssl-certificates/ – Explicit registration of a certificate with SQL Server, this explains why you update the registry key.
- https://stackoverflow.com/questions/37228851/delete-certificate-from-computer-store – Delete a certificate from the store.
- https://tracyboggiano.com/archive/2017/08/setup-ssl-certificate/ – Very useful article on how to import certificates.
- https://superuser.com/questions/849152/using-powershell-how-do-i-extract-the-thumbprint-from-an-ssl-certificate-withou – How to get a certificate thumbprint without installing it.
- https://stackoverflow.com/questions/40046916/how-to-grant-permission-to-user-on-certificate-private-key-using-powershell – Very useful question on how to add permissions to a certificate.
- https://docs.microsoft.com/en-us/powershell/module/microsoft.powershell.security/set-executionpolicy?view=powershell-6 – Execution policy for PowerShell
- https://stackoverflow.com/questions/36817627/ssl-certificate-missing-from-dropdown-in-sql-server-configuration-manager – Using a certificate that doesn’t match the FQDN of the computer.
- https://blogs.msdn.microsoft.com/sqlserverfaq/2012/04/04/can-tls-certificate-be-used-for-sql-server-encryption-on-the-wire/ – Information on installing a certificate into SQL Server.