My KVM set up will almost certainly comprise only Linux machines but there is an outside chance I’ll need to run a Windows server in order to have somewhere to install a copy of SQL Server for development purposes. This article will discuss installing non-Linux based operating systems on / under KVM. I’ll be installing a copy of Windows XP for now as that is what I have immediately available and Windows XP is quite a bit smaller than Windows Server 2014 so should install faster. Either way the process should be largely the same.
Installing Ubuntu based guests is almost trivially easy with ubuntu-vm-builder but other operating systems don’t have such useful tools instead you have to switch over to using virt-manager and or virt-install. As with all things Linux there are a dozen different ways to solve every problem and if you search online I’m sure you’ll find plenty of alternatives to the method I’ll use here.
The problem with installing operating systems other than Ubuntu is that you invariably need to access a console during the installation process in order to configure the system. There are several options for getting access to the console but the one I’m going to use is virt-manager since this can also be used to manage the KVM host machine. The problem with using virt-manager is that you need a Linux machine with a desktop installed in order to run it and I’m currently running on Windows.
Fortunately if you’ve been playing along at home with the KVM series on this site you should already have a guest machine installed that has a desktop environment and is configured for access via X2Go – that’s lucky. Connect to the guest desktop and install virt-manager and ksshaskpass (or the askpass relevant to your desktop):
sudo apt-get install virt-manager ksshaskpass
Before starting up virt-manager open a shell to the host and copy the iso you want to install somewhere that is easy to access thought virt-manager. The default KVM install creates a single storage pool that points at the /var/lib/libvirt/images directory and you can place the iso in there1. Now install virt-install if it isn’t installed already:
sudo apt-get install virtinst
Switch back to the guest desktop and start virt-manager. It will initially fail to connect to a local KVM instance, just dismiss the error messages and delete the local connection. Use File > Add Connection to create a new connection to a remote machine. Fill in the connection settings appropriate for your environment (Note, I meant to type in 192.168.1.150 for an IP address).
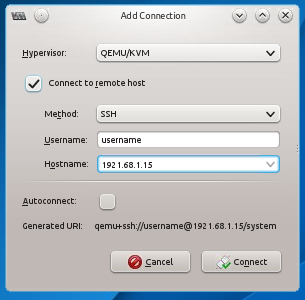
You’ll need to make sure the “Connect to remote host” box is check as logically you are remote to the host even though they are physically on the same machine. I prefer not to auto-connect but it seems to work if you want to use that option. When you click connect the settings will be saved and it’ll try to connect to the host machine.
At this point things get a bit weird. KDE will try and ask for your SSH password for the host machine and it will store this in the KDE Wallet. If the guest is a fresh install this will require you to first create a password for the wallet before then entering the password for the SSH connection. At this point and for some unknown reason another dialog pops up which says something like “Type ‘yes’ or ‘no’”. I assumed I’d fluffed my password and that it was another prompt for the password just with a bad message but apparently you have to enter ‘yes’ or it won’t make a connection to the host machine – ever. If, like me, you screw it up on that second dialog you can fix things by deleting the saved passwords from in the wallet and restarting virt-manager, suddenly everything starts working again.
Once you are connected you should see a main screen that looks a bit like this:
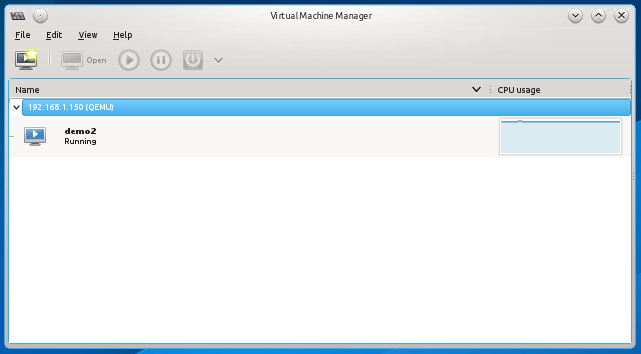
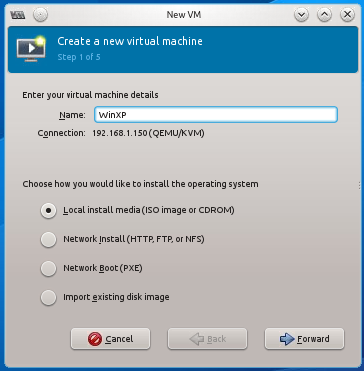
As you can see I only have demo2 installed on this host at the moment (and it’s running flat out). Right click on the host and select “New” to create a new host. Enter a name for the host, make sure “Local install” is selected and then press “Forward”:
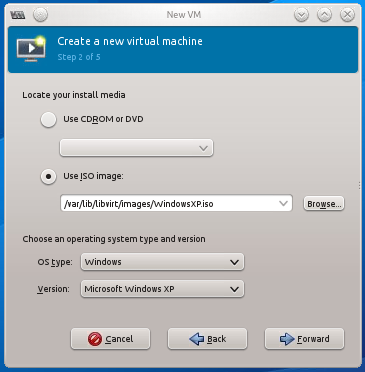
Select “Use iso Image” and then click “Browse…”. You will be presented with a list of storage pools defined on the host. Assuming you’ve copied the iso into the images folder as described above you should be able to select it here. Pick your “OS Type” (from the limited list) and the “Version” then press “Forward”.
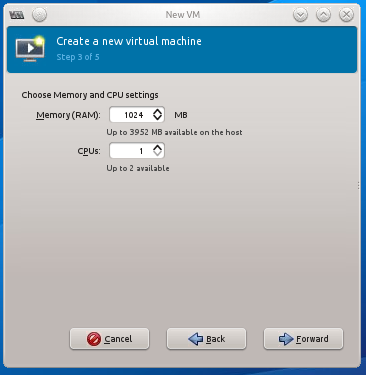
Choose an amount of memory and number of CPU’s to assign to the guest, you can always easily change this later. Since my host is already overloaded I’m going to leave it at the fairly modest default of 1024 MB and 1 CPU. Press “Forward”:
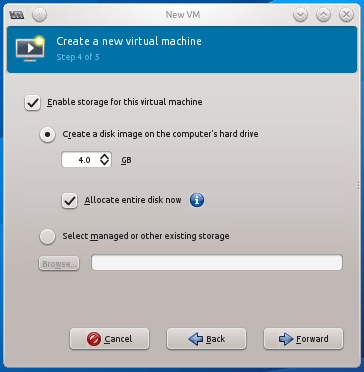
Set some storage options for the new guest. I reduced the allocated storage from 8.0 GB to 4.0 GB simply because this is a throw away install so there’s no point wasting time creating a big disk. Other than that there isn’t much to change on this page, when you are done press “Forward”:
The final page simply displays an overview of the settings chosen and allows you to do a little customization of the guest machine under advanced options. When you are happy with the settings press “Finish” (which for some reason has a cross icon on it). You may like to copy the MAC address and put it into your DHCP server if you are using a set up similar to mine where everything is done by DHCP.:
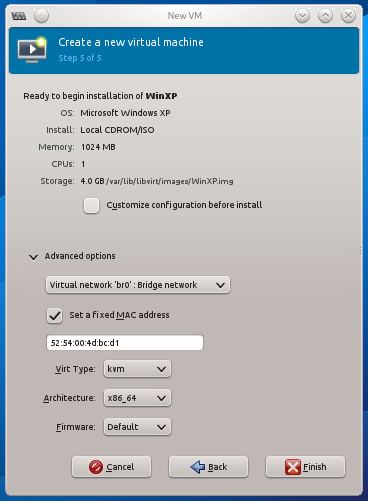
After pressing “Finish” the system will automatically start the install process and then attempt to connect to the console. It will ask for the SSH password again in order to connect to guest machine console and you can save that password if you want. Installation of the new guest operating system should proceed as normal for that OS.
One of the things that I quite like about Windows machines is that they all come with Remote Desktop built in and it’s actually quite a good produce. Once you’ve got your Windows guest installed I strongly suggest switching remote desktop access on and then managing it that way rather than through virt-manager.
Alternative Ways to Run Virt-Manager
So I admit that my method of running virt-manager leaves a bit to be desired, it means the host has to be running at least one guest that has a desktop installed which I was aiming to avoid. The only reason I was aiming to avoid it though is because I have fairly limited hardware resources and no budget for more. If I was doing this for real I’d have more than enough power and memory on the server to run several desktops.
Solution 1 – Use VirtualBox
This is probably the easiest of the alternative solutions and certainly the cheapest. Install VirtualBox on the Windows machine and then install Ubuntu in a guest on that. You can then install virt-manager on the guest and configure the host that way.
Solution 2 – Dedicated Management Machine
If you have a large install of KVM hosts running a machine specifically for managing them might be an option.
Solution 3 – Cygwin / Xming
Using a combination of PuTTY and Xming or Cygmin it’s possible to get virt-manager running in it’s own window on Windows. I’ve done this in the past with other applications when I’ve been pushed but I don’t like it much – it always feels like clearing a paper jam in a shredder while it’s still powered on. There are several good pages on the web about this solution.
References
Notes
- Strictly speaking you probably should be placing the iso image in /var/lib/libvirt/images as (I think) this is intended for virtual machine images rather than install media – it works for the purposes of this article though.