The installation of Proxmox is well covered in official guide so I won’t cover that here. There really aren’t many choices to be made during install anyway. I installed the OS on a 1TB M.2 drive and I plan on storing most of my VM’s there as well. Obviously, this will be backed up as the VM’s would be vulnerable to a single point failure. Additionally the machine will have a five disk ZFS RAIDZ2 array for bulk storage. The disks will be 16TB giving an available storage of around TB (TiB)
Creating the Storage Array
I was completely new to ZFS when I decided to embark on this build and I have to admit it was a bit daunting. Fortunately I found an amazingly good tutorial on ZFS that got me past the “what’s a vdev” stage. While learning a bit about ZFS I came across the “do I need EEC ram” debate. This is one of those debates that techies absolutely love (such as tabs or spaces for indenting (tabs obviously)) because it has no obviously correct answer, it depends. Personally, I’m in the EEC ram is not needed camp, this article paints a compelling case. Long story short, unless the machine absolutely has it in for you you’ll be fine and if it does have it in for you, you’ll lose data anyway.
Another factor you need to consider before creating your array is whether you’ll use compression on it. I’ll mostly be storing video on the array which isn’t going to compress much so my initial plan was to turn compression off. Everything I’ve read, however, has said that turning compression on has essentially no downsides. User Schmidsfeld over on Reddit did a comprehensive test (part 2) of compression and the affect it has on performance. Their conclusion was that zstd was the best choice for spinning disks and the effect on incompressible data was unmeasurable (same throughput).
Another setting that is a bit of a trap for new players is the ashift setting. This tells ZFS the size of the sectors on the disk and pretty much should always be set to twelve because nearly all disks have 4k sectors now. There are some very old drives with 512b sectors and I understand you can find enterprise drives with larger sectors but if you’re reading this you have 4k sectors so ashift=12.
Yet another trap for new players is referring to the disks incorrectly when you create the pool. You should make sure to use the disk ID as returned by:
ls -l /dev/disk/by-id/
For instance one of my disks is called “ata-ST16000NM001G-2KK103_ZL21R7LK” and some output of the above command is shown below. The last part of the name is the serial number of the disk and uniquely identifies it. That serial number is written on the disk label and I’ve also written it on the front and back of the disk so I can’t easily pull the wrong disk out of the array. The reason you shouldn’t use OS applied identifiers such as /dev/sda is that, technically, they can change as they are just a mount point assigned by the OS – this becomes a particular issue when you replace a drive in an array.
lrwxrwxrwx 1 root root  9 May 18 11:22 ata-ST16000NM001G-2KK103_ZL21R7LK -> ../../sde
lrwxrwxrwx 1 root root  9 May 18 11:22 ata-ST16000NM001G-2KK103_ZL22R6W2 -> ../../sdd
lrwxrwxrwx 1 root root  9 May 18 14:23 ata-ST16000NM001G-2KK103_ZL2ATVC1 -> ../../sdb
lrwxrwxrwx 1 root root  9 May 18 14:23 ata-ST16000NM001G-2KK103_ZL2PSG9B -> ../../sdc
lrwxrwxrwx 1 root root  9 May 18 14:23 ata-ST16000NM001G-2KK103_ZL2PSV35 -> ../../sda
While most of the management of the ZFS pool will be carried out at the command line I’m going to use the Proxmox interface to create it for the simple reason it’s much less typing. I’ve verified that Proxmox doesn’t do anything fancy, it just issues a zpool create command.

Note that I turned off the “Add Storage” option as that was suggested in this video. It honestly doesn’t seem to matter either way, you can just remove any created storage if necessary. Once the pool is created open a command line and have a look at it.
# zpool status

  pool: tank
 state: ONLINE
config:

        NAME                                   STATE     READ WRITE CKSUM
        tank                                   ONLINE       0     0     0
          raidz2-0                             ONLINE       0     0     0
            ata-ST16000NM001G-2KK103_ZL2PSV35  ONLINE       0     0     0
            ata-ST16000NM001G-2KK103_ZL2ATVC1  ONLINE       0     0     0
            ata-ST16000NM001G-2KK103_ZL2PSG9B  ONLINE       0     0     0
            ata-ST16000NM001G-2KK103_ZL22R6W2  ONLINE       0     0     0
            ata-ST16000NM001G-2KK103_ZL21R7LK  ONLINE       0     0     0

errors: No known data errors
As you can see I have a RAIDZ2 and no problems reported. The pool name is tank, this is very commonly used as a pool name it’s not actually required. Notice that Proxmox correctly uses the disk ID’s for creating the pool. the mount point for this pool is /tank, this can be changed but there is little reason to do so.
The zpool list command will give us more information about the array.
# zpool list

NAME   SIZE  ALLOC   FREE  CKPOINT  EXPANDSZ   FRAG    CAP  DEDUP    HEALTH  ALTROOT
tank  72.8T  1.41M  72.7T        -         -     0%     0%  1.00x    ONLINE  -
It’s important that pools are scrubbed on a regular basis. I’ve heard people say they scrub the whole pool every week but that seems a little keen to me. I’ll be doing it once a month I think unless I see a good reason to change.
# zpool scrub tank
# zpool status

  pool: tank
 state: ONLINE
  scan: scrub repaired 0B in 00:00:00 with 0 errors on Thu May 18 16:29:20 2023
config:

        NAME                                   STATE     READ WRITE CKSUM
        tank                                   ONLINE       0     0     0
          raidz2-0                             ONLINE       0     0     0
            ata-ST16000NM001G-2KK103_ZL2PSV35  ONLINE       0     0     0
            ata-ST16000NM001G-2KK103_ZL2ATVC1  ONLINE       0     0     0
            ata-ST16000NM001G-2KK103_ZL2PSG9B  ONLINE       0     0     0
            ata-ST16000NM001G-2KK103_ZL22R6W2  ONLINE       0     0     0
            ata-ST16000NM001G-2KK103_ZL21R7LK  ONLINE       0     0     0

errors: No known data errors
Unsurprisingly my first scrub didn’t pick up any issues as there’s nothing in the pool at the moment. Above the pools is the filesytem layer which you interact with though the zfs command. List the filesystems like this:
# zfs list

NAME   USED  AVAIL     REFER  MOUNTPOINT
tank  1.04M  42.9T      170K  /tank
Note that this also gives a figure for how much space is available. This figure is significantly smaller than the zpool figure because this is how much is actually available to use rather than the total raw array storage provided by zpool.
Adding the ZFS Dataset as Storage
When I first configured the pool above I deselected the “Add Storage” option. This seemed like a good idea at the time but there’s actually no good reason to turn it off as far as I can tell. To add the storage to the system select the Datacenter node in the in the left menu and Storage from the middle menu. Click add towards the top and select ZFS. This will open a dialogue which you then fill in. Select Disk Images and Container for content, this won’t create any directories on the pool like other content types. Select the pool that will be the target for the storage and give it and ID like data.
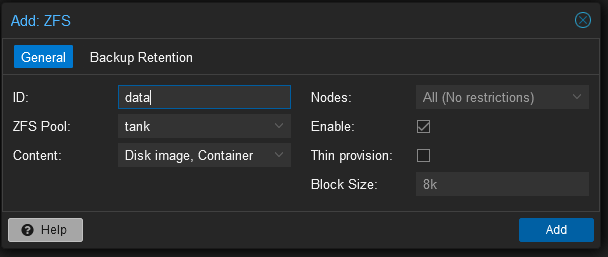
This really doesn’t change anything about the set up, the only thing it does is make the ZFS array a target for VMs and provide a GUI frontend so you can see how much storage you’re using.